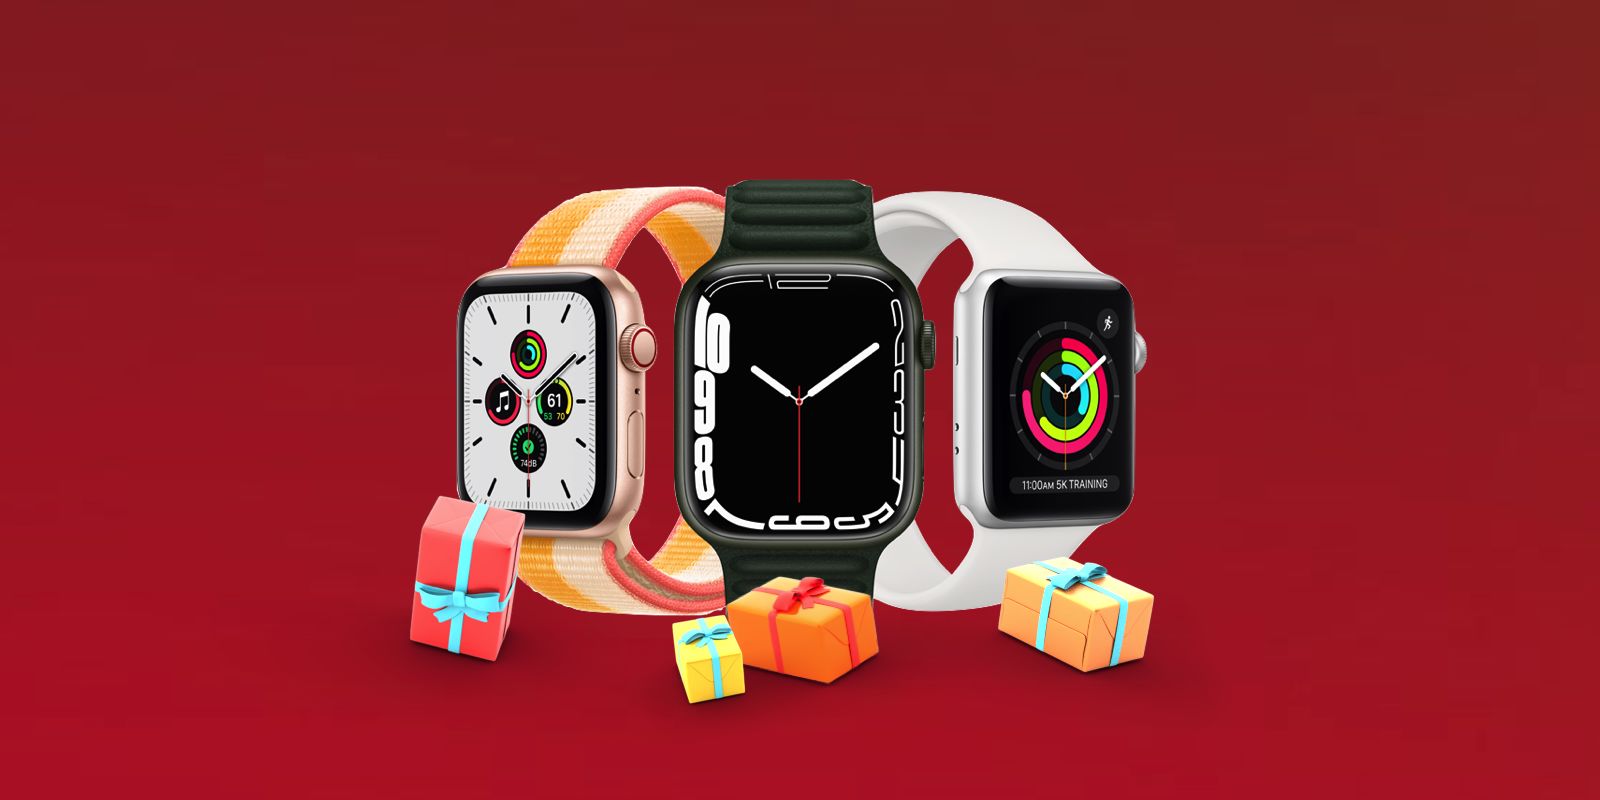
Apple Watch Basics
New to the Apple Watch? We have some how-tos for beginners that will walk you through setup and basic features on your device so you don't miss out on anything.
- How to View Apps on Apple Watch as a List
- How to Force-Quit Misbehaving Apple Watch Apps
- How to Reset or Force Restart Your Apple Watch
- How to Add a Passcode to Your Apple Watch and What to Do if You Forget It
- How to Change Fitness Goals on Apple Watch
- How to Use Apple Watch to Get Directions
- How to Pair Bluetooth Headphones and Listen to Music on Apple Watch
- How to Answer and Make Phone Calls on Apple Watch
- How to Send and Respond to Messages on Apple Watch
- How to Choose the Right Apple Watch Band Size
Tips for New Apple Watch Owners
1. Track Your Sleep
If you wear your Apple Watch to bed, it will track the amount of time that you're asleep, providing insight into how long you're in bed, how much of that time you spend sleeping, and your heart rate.
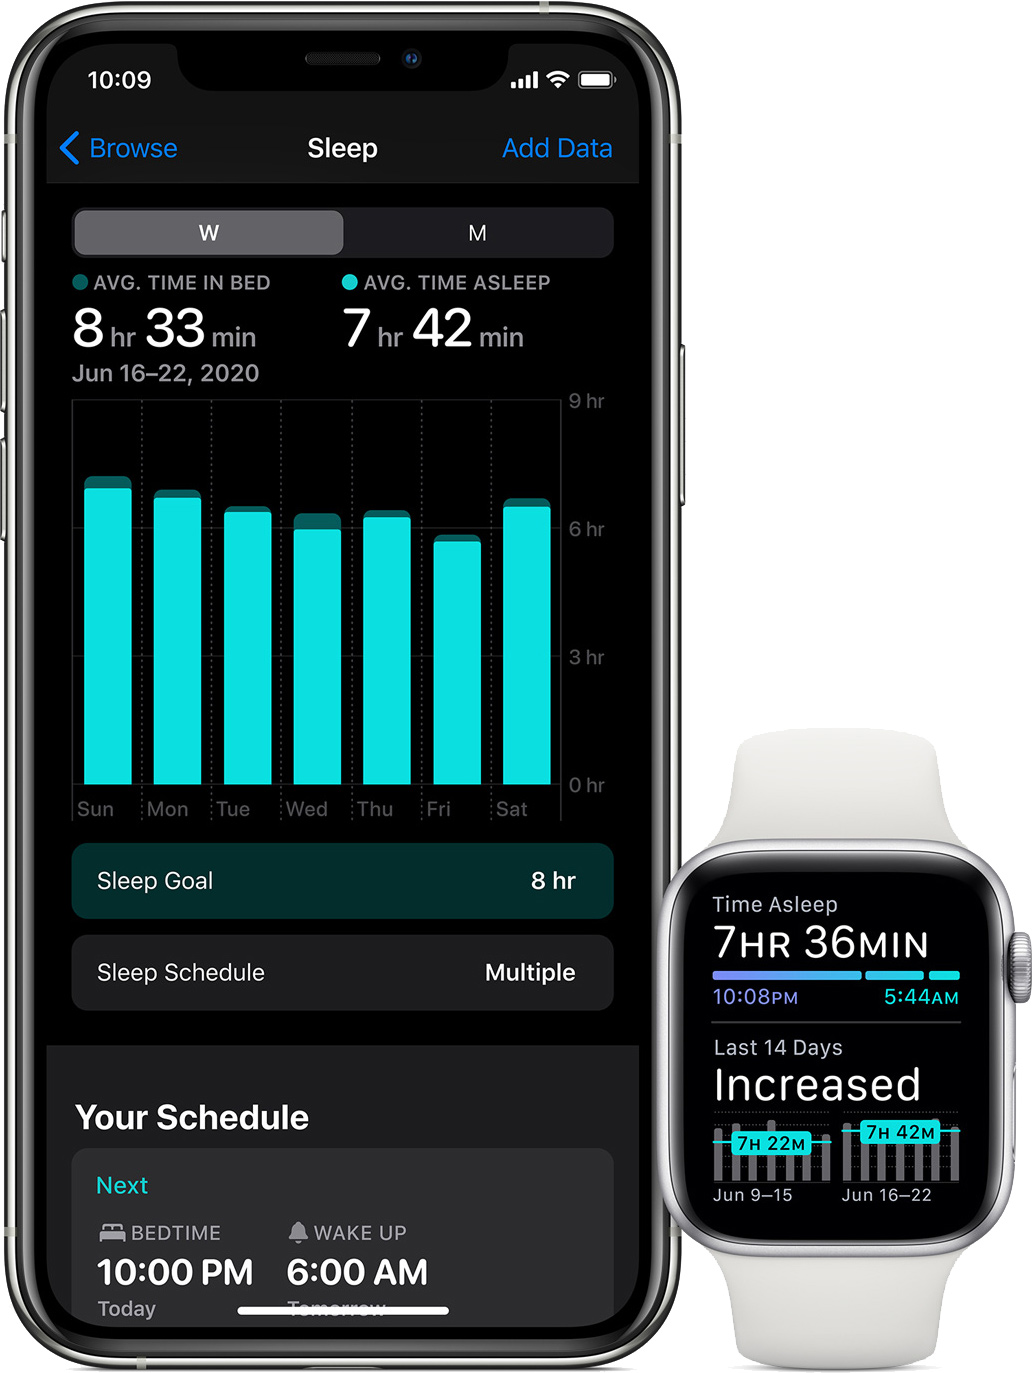
With watchOS 9, Apple enhanced the sleep tracking feature on the Apple Watch, so now it can tell you how much time you spent in REM, Core, or Deep sleep during the night, as well as how often and when you were awake.
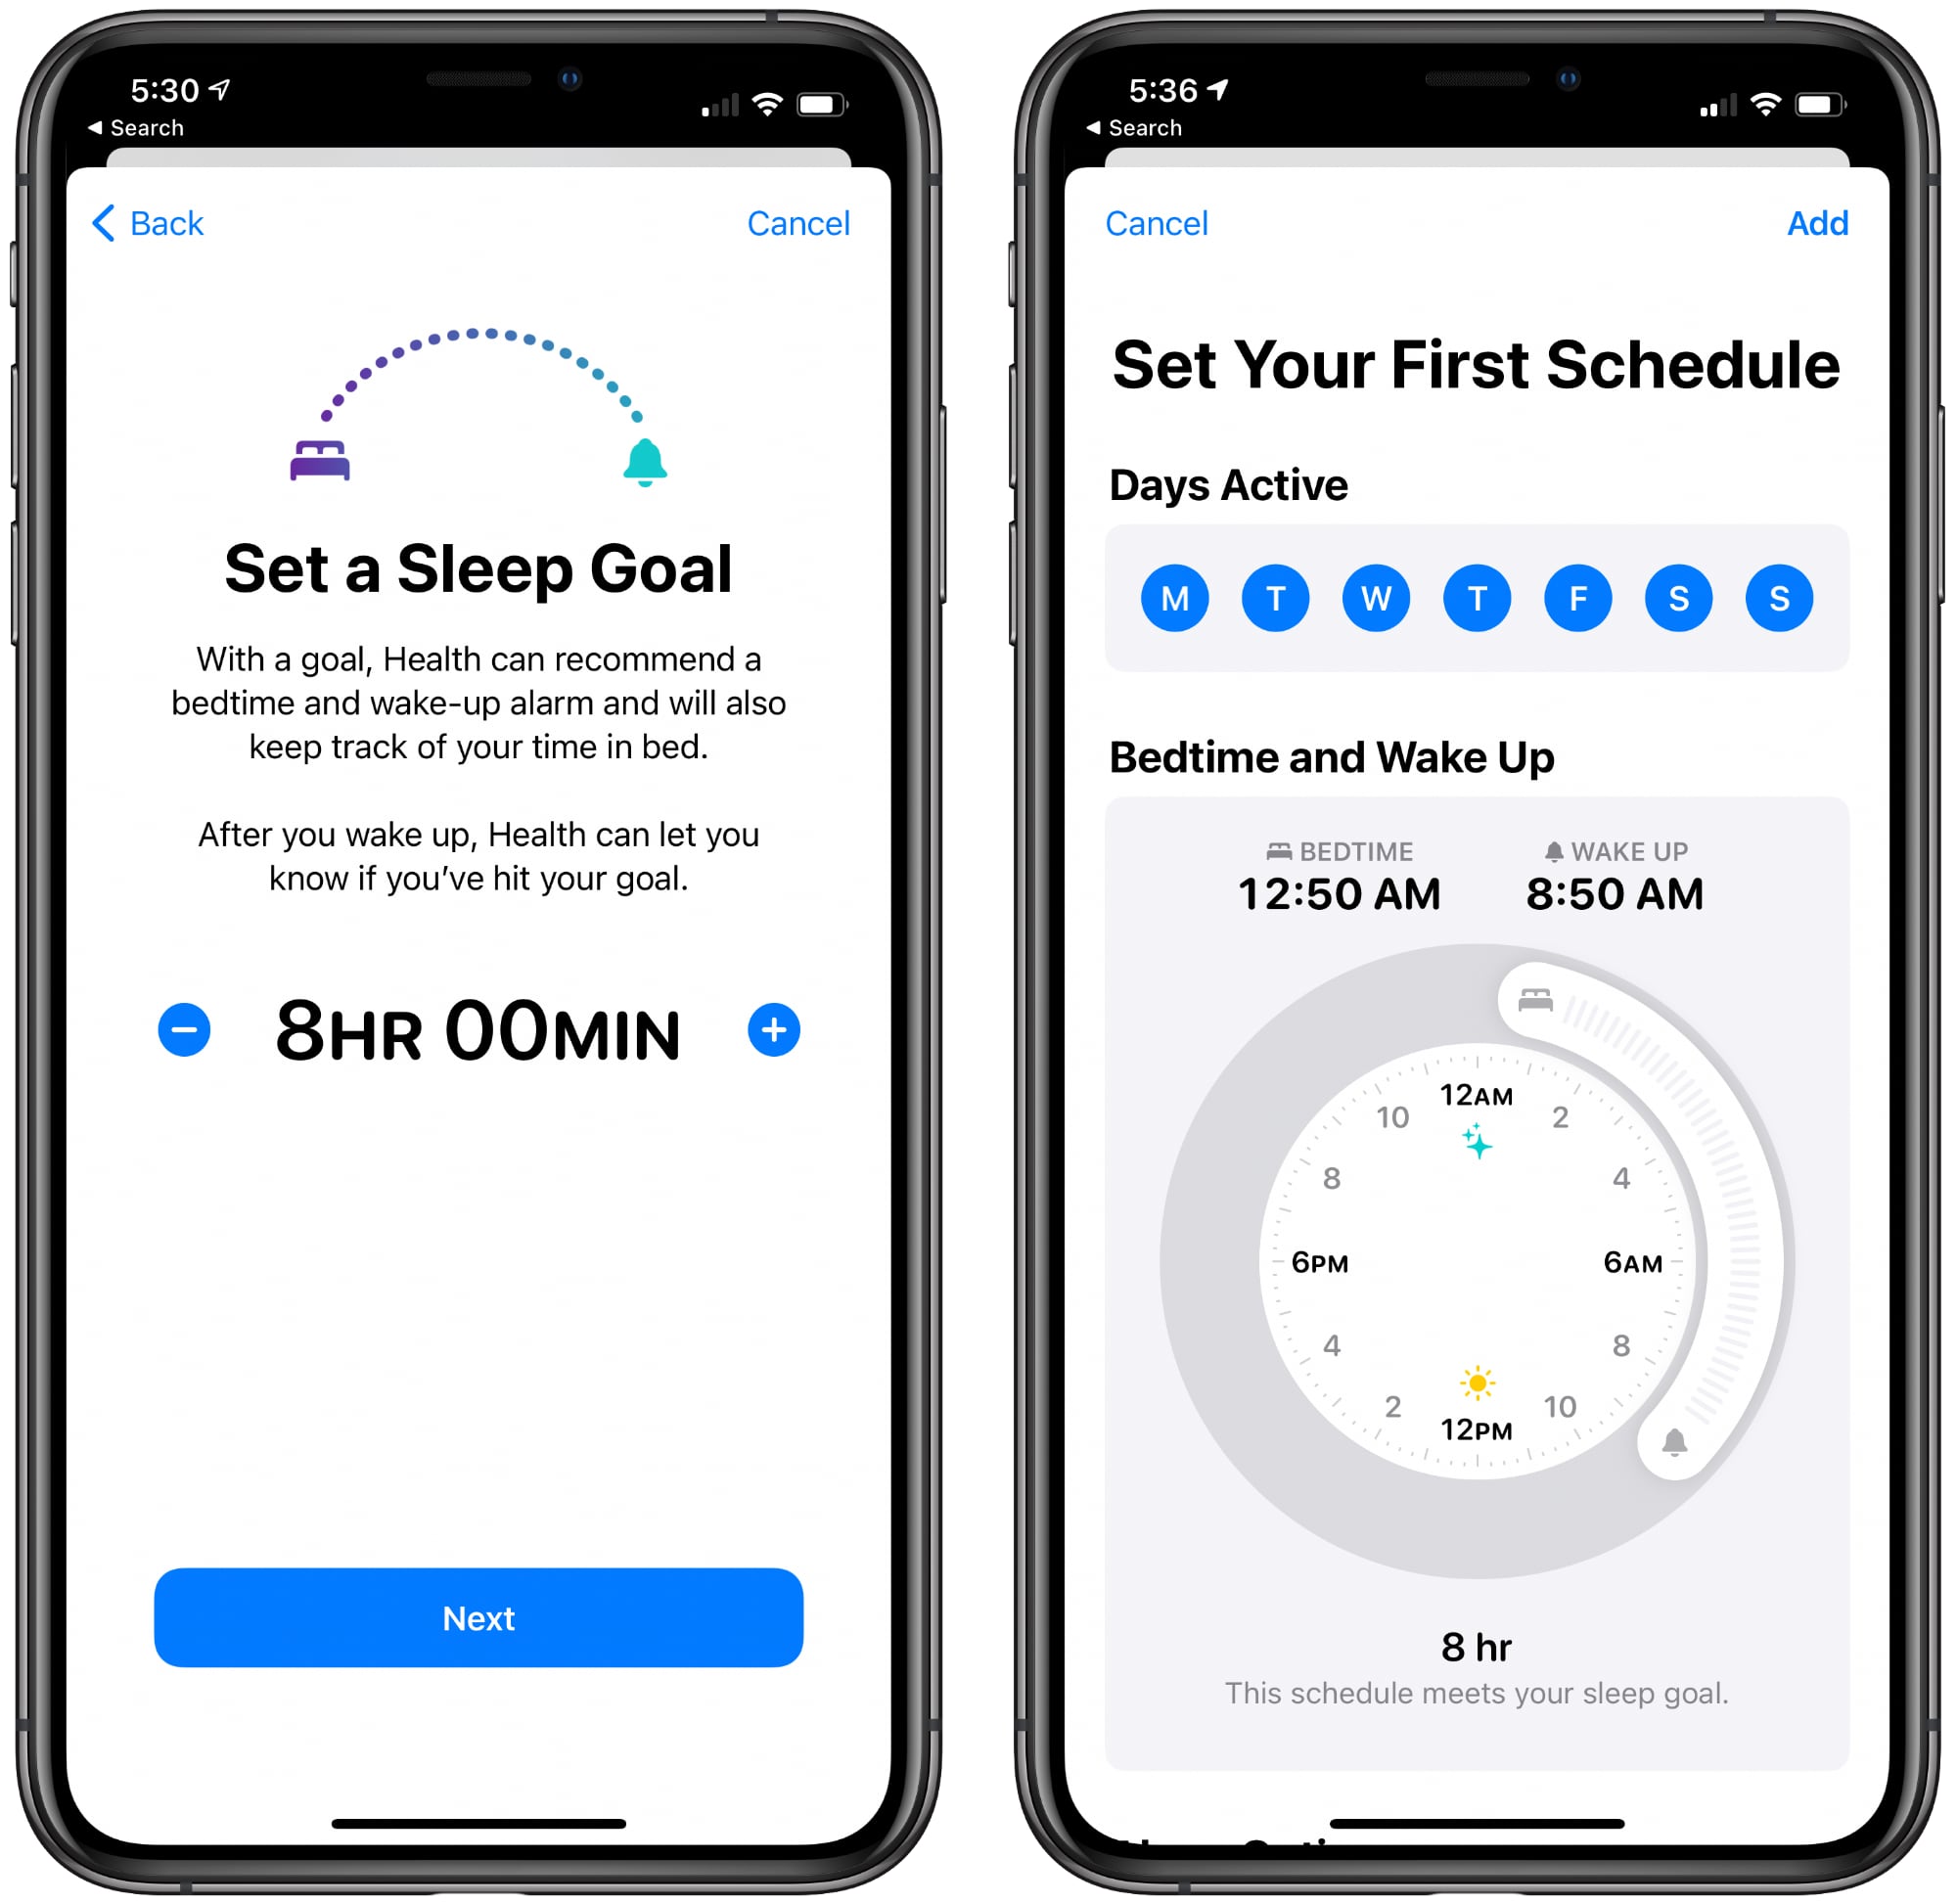
To have your Apple Watch automatically track your sleep when you go to bed, you need to set up Sleep Mode, which you can do in the Health app by following our tutorials.
- How to Set a Sleep Schedule on iPhone and Apple Watch
- How to Use Sleep Mode on iPhone and Apple Watch
With Sleep Mode, you tell your devices what time you want to go to sleep and what time you want to start winding down for bed. Sleep Mode will automatically silence your notifications at your Wind Down time, though you can customize who can contact you in Sleep Mode using the Focus interface.
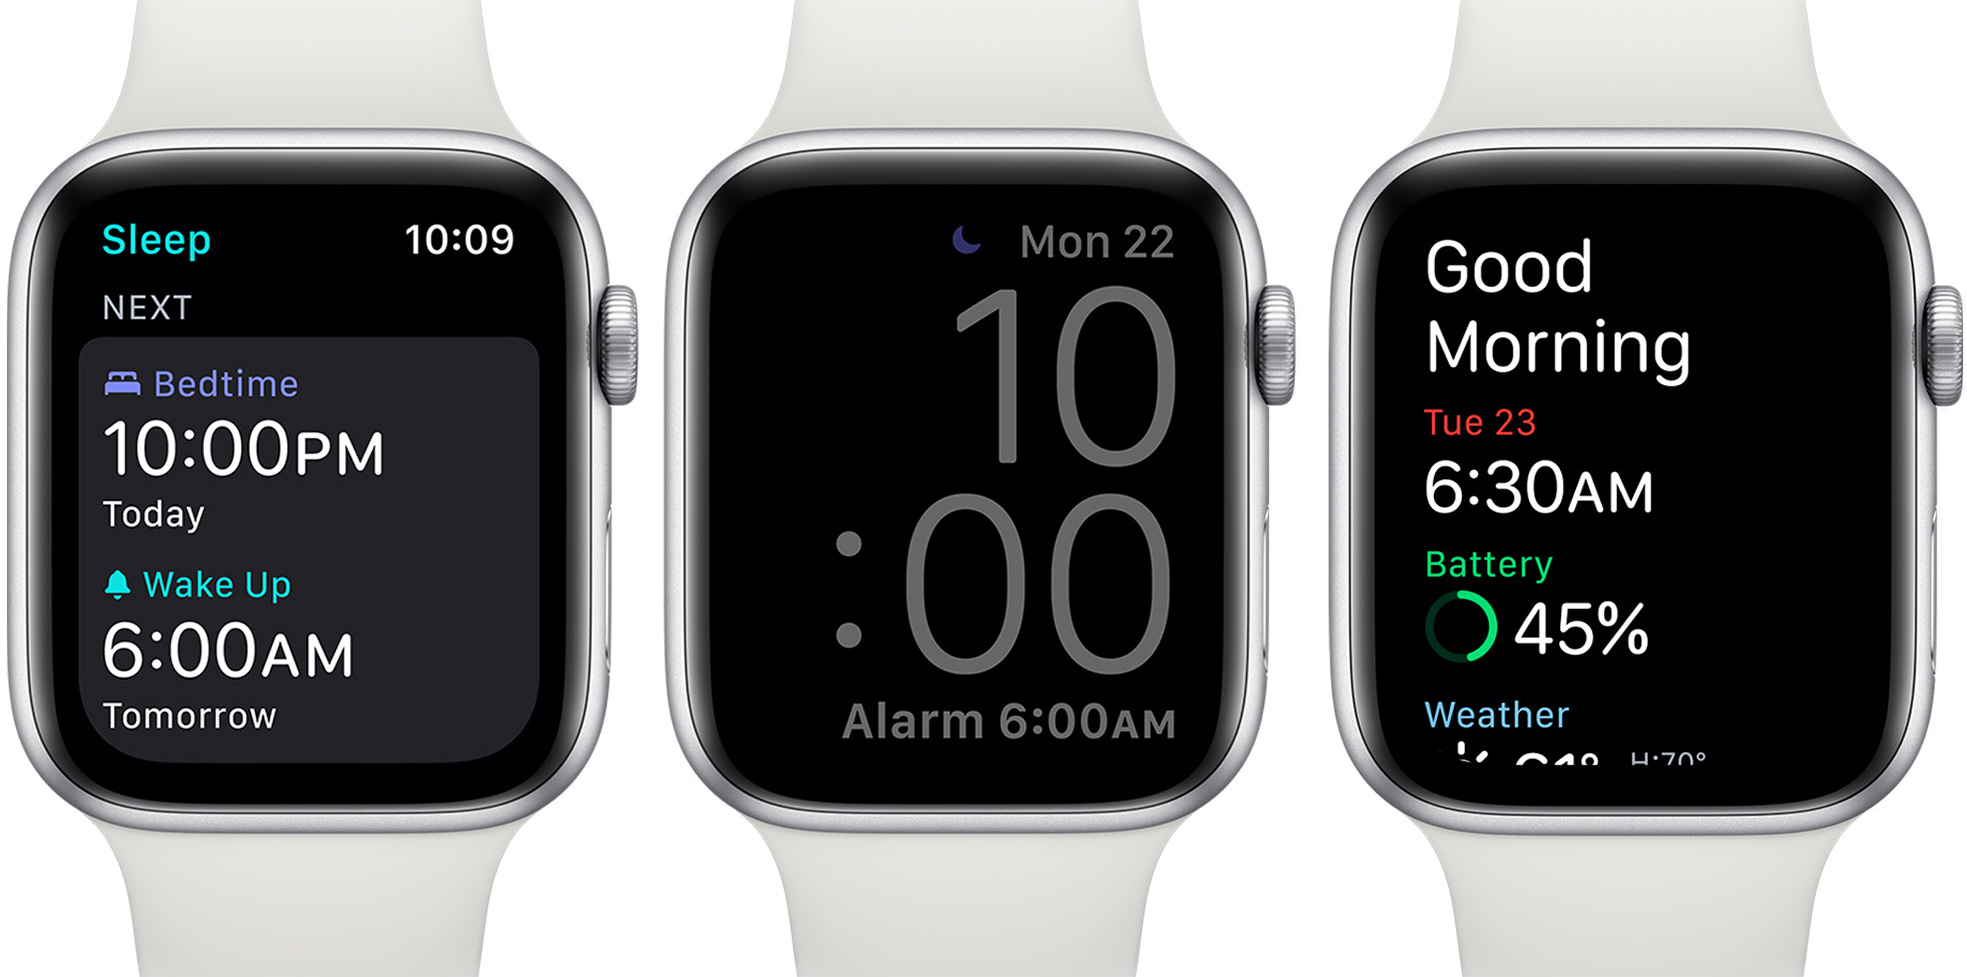
When you wake up in the morning, Apple will provide you with a summary of the notifications that you received while you were sleeping, the weather for the day, and more.
Sleep data that's gathered by Apple Watch can be viewed in the Health app by going to the "Browse" tab and selecting "Sleep." It will provide information on your sleep trends, such as how well you slept one night compared to another night, and how consistent your sleep is from night to night.
Tip: Wearing your Apple Watch to bed has a benefit in addition to sleep tracking - you can get woken up with a haptic alarm. The Apple Watch will gently tap you on the wrist until you wake up, which is useful if you sleep with a partner and want to wake quietly.
2. Extend Your Battery Life With Low Power Mode
With watchOS 9, the Apple Watch lineup gained a Low Power Mode that basically mirrors Low Power Mode on the iPhone. It extends your battery life by shutting down some power hungry features.
- Swipe up on the watch face of your Apple Watch to bring up Control Center.
- Tap the battery percentage button.
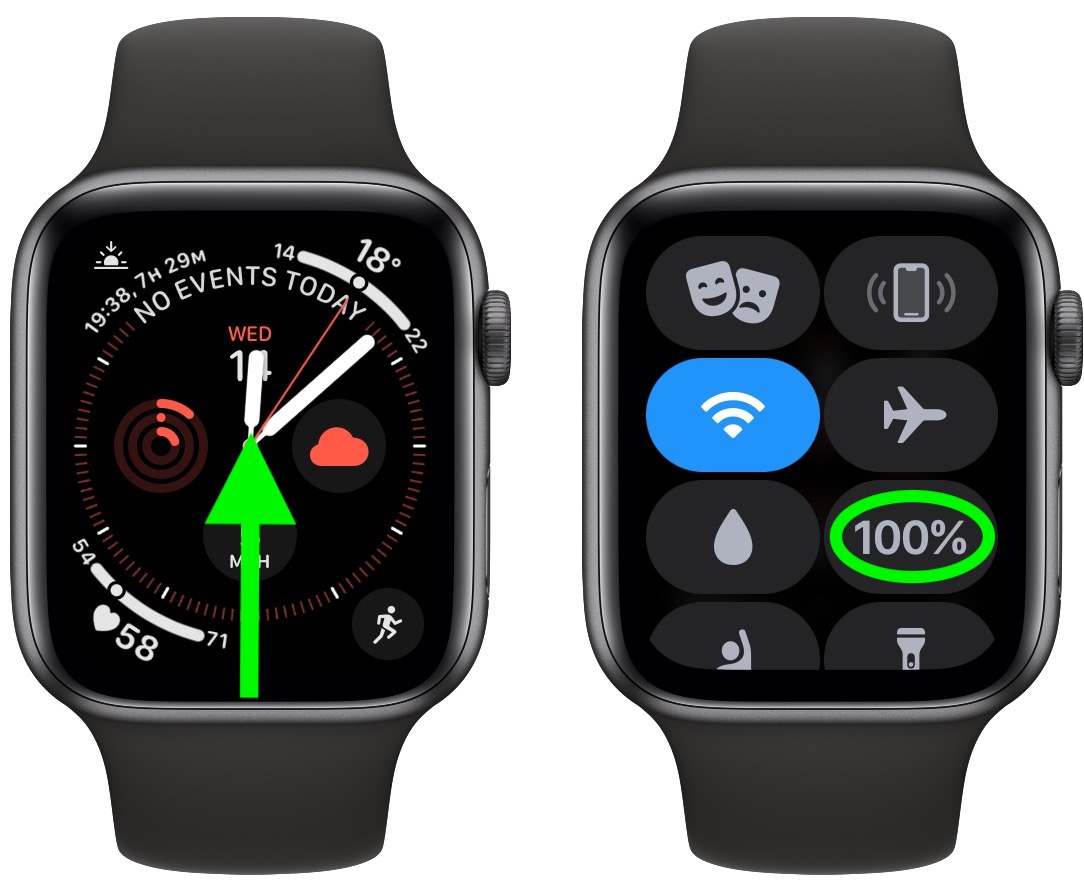
- Tap the switch next to Low Power Mode.
- After reading the on-screen prompt, scroll to the bottom and select from the following: Turn On, Turn On For..., and Dismiss.
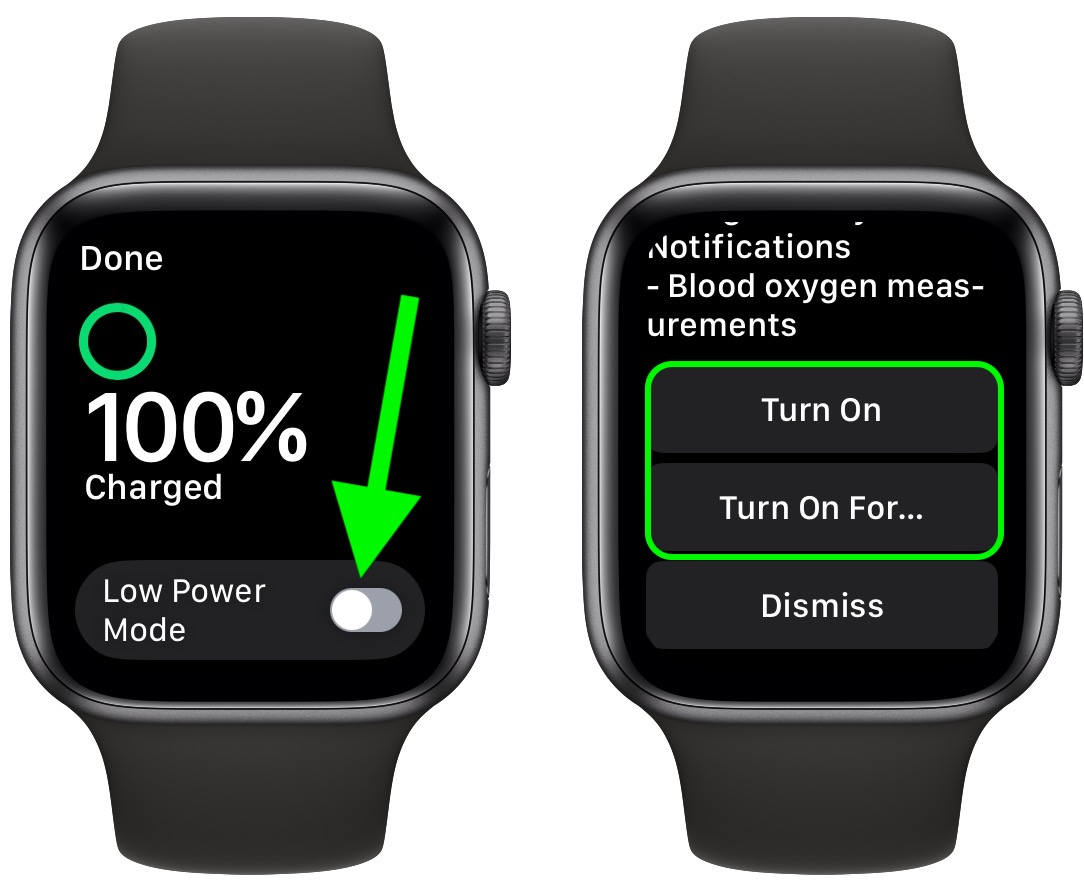
- If you tapped Turn On For..., select On for 1 Day, On for 2 Days, or On for 3 Days on the second screen.
When your Apple Watch is in Low Power Mode, a yellow circle icon appears at the top of the screen. Also, the battery percentage button in Control Center, the charging animation, and the time in Nightstand mode all turn yellow.
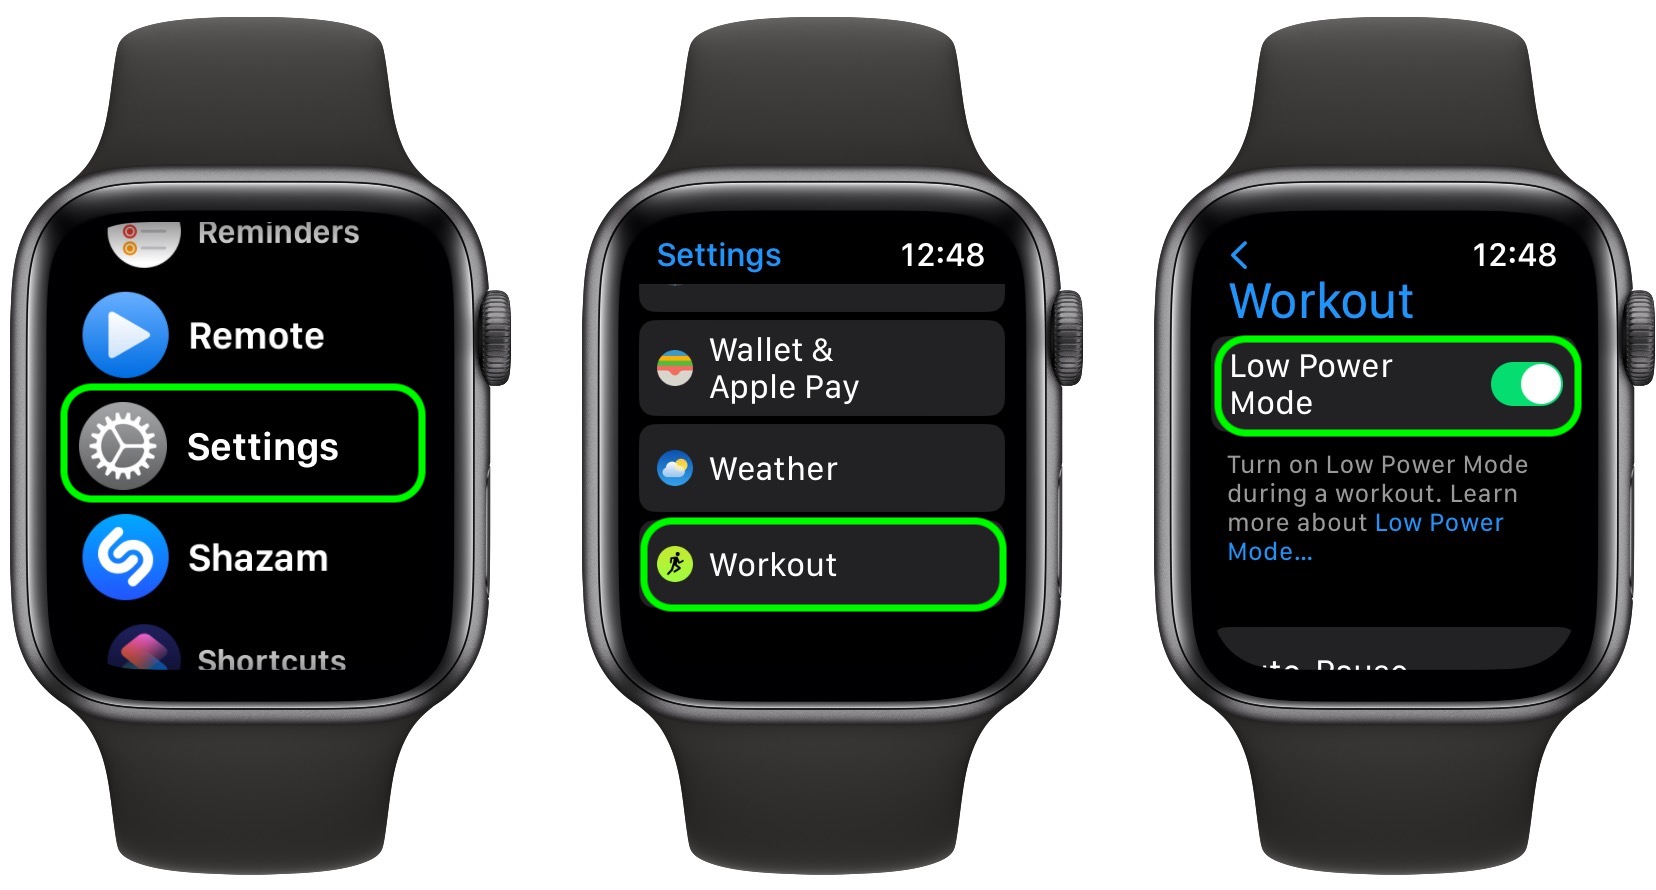
You can also set your Apple Watch to automatically enter Low Power Mode whenever you start a workout, which is particularly useful if you plan to work out for a long time without it draining battery. Note that when you use the Workout app in Low Power Mode, metrics such as heart rate and pace are still measured.
- Launch the Settings app on your Apple Watch.
- Scroll down, then tap Workout.
- Tap the switch next to Low Power Mode to enable the automation.
Note that when Low Power Mode is enabled without your iPhone nearby, and you open an app that requires a data connection, Wi-Fi or cellular connectivity will resume so that the app can function properly, which can cause impact battery life.
When you enable Low Power Mode, these are the features that are disabled:
- Always On display
- Heart rate notifications for irregular rhythm, high heart rate, and low heart rate
- Background heart rate measurements
- Background blood oxygen measurements
- Start workout reminder
- Wi-Fi and cellular connections (when iPhone is not nearby)
- Incoming phone calls and notifications (when iPhone is not nearby)
These features are impacted, but not entirely disabled:
- Making a phone call can take longer
- Background app refresh happens less frequently
- Complications update less frequently
- Siri can take longer to process a request
- Some animations and scrolling might appear less smooth
Other safety functions like Fall Detection remain on while in Low Power mode.
3. Set a Photo as Your Watch Face
You can set one of your own photos as your watch face so you can glance down at your favorite places, people, or pets whenever you go to check the time. It's easiest to set a photo as a watch face on iPhone, following these instructions:
- Open up the Watch app on iPhone.
- Tap on "Face Gallery."

- Scroll down to "Photos" and tap it.
- You can select an album of photos, such as your Favorites, or choose to select up to 24 individual photos from your Camera Roll. There's also an option for Dynamic, which uses photos from your Memories.
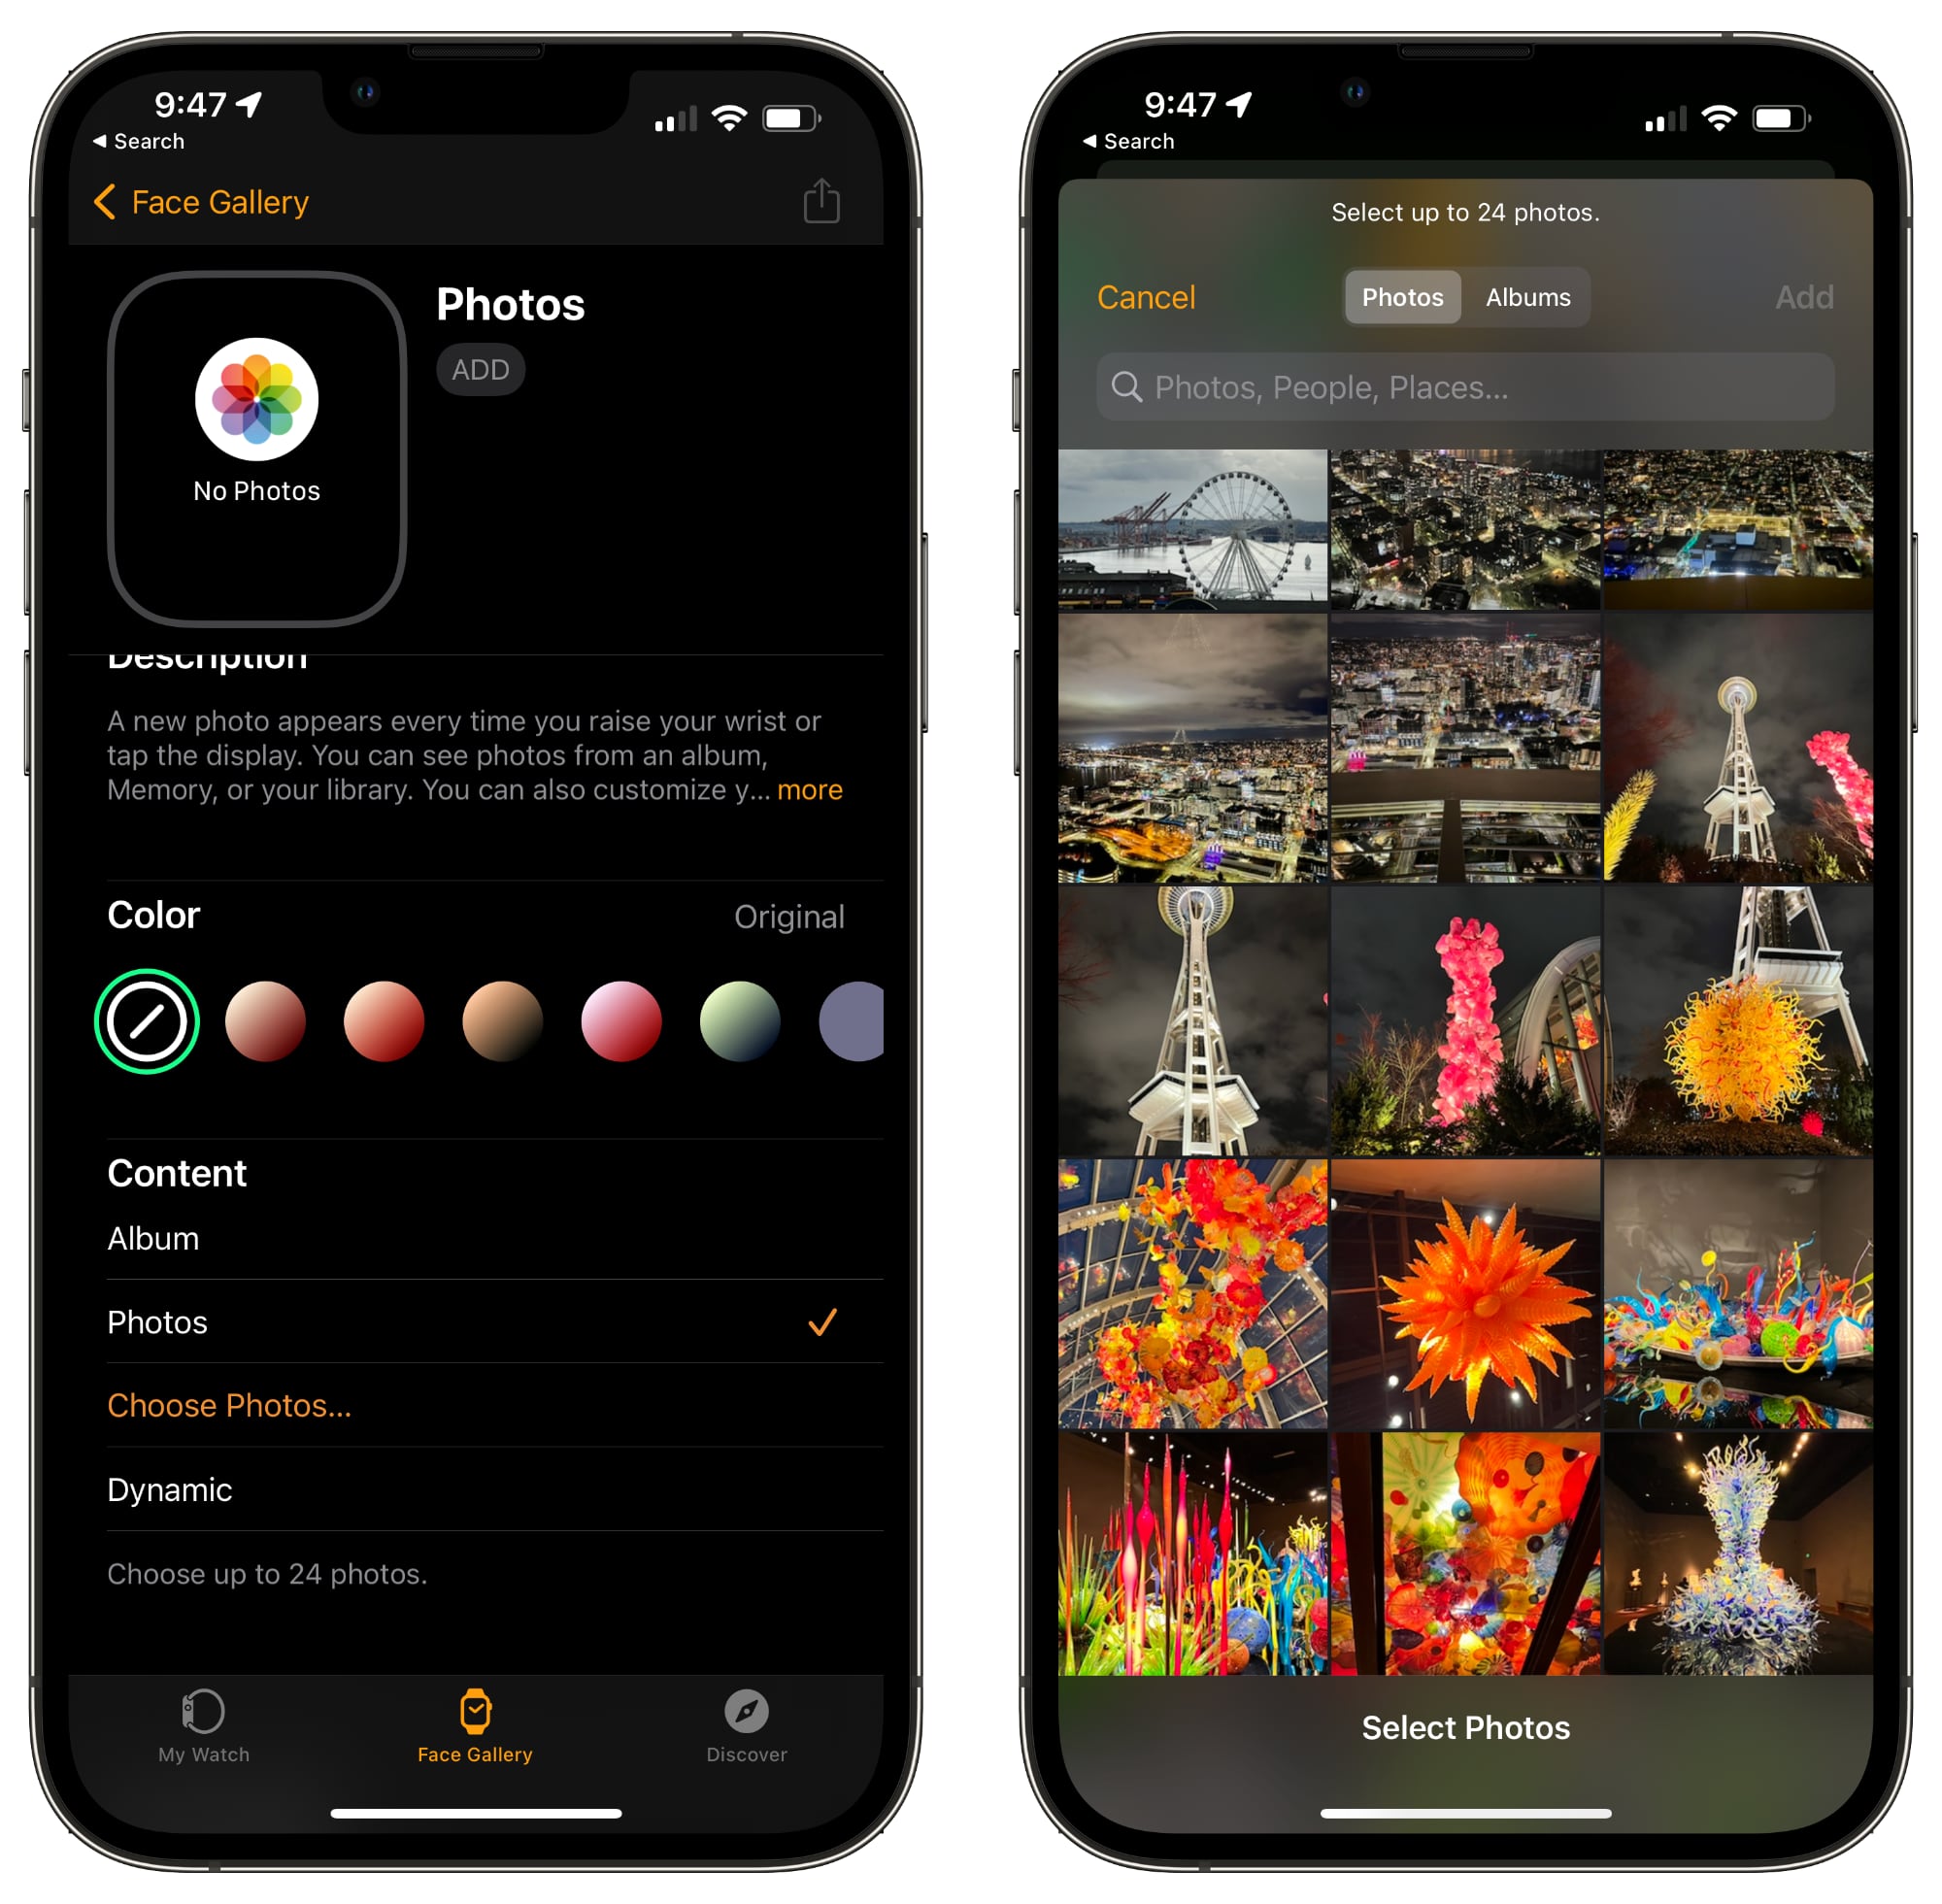
- Tap on "Album" to choose an album, select "Choose Photos..." to choose photos, or tap on "Dynamic" to have it pull from Memories.
- If you want to add a tint to your photos, pick a color from the top bar.
- Scroll down to "Time Position" and choose "Top" or "Bottom," and then select your Complications if you want to use them.
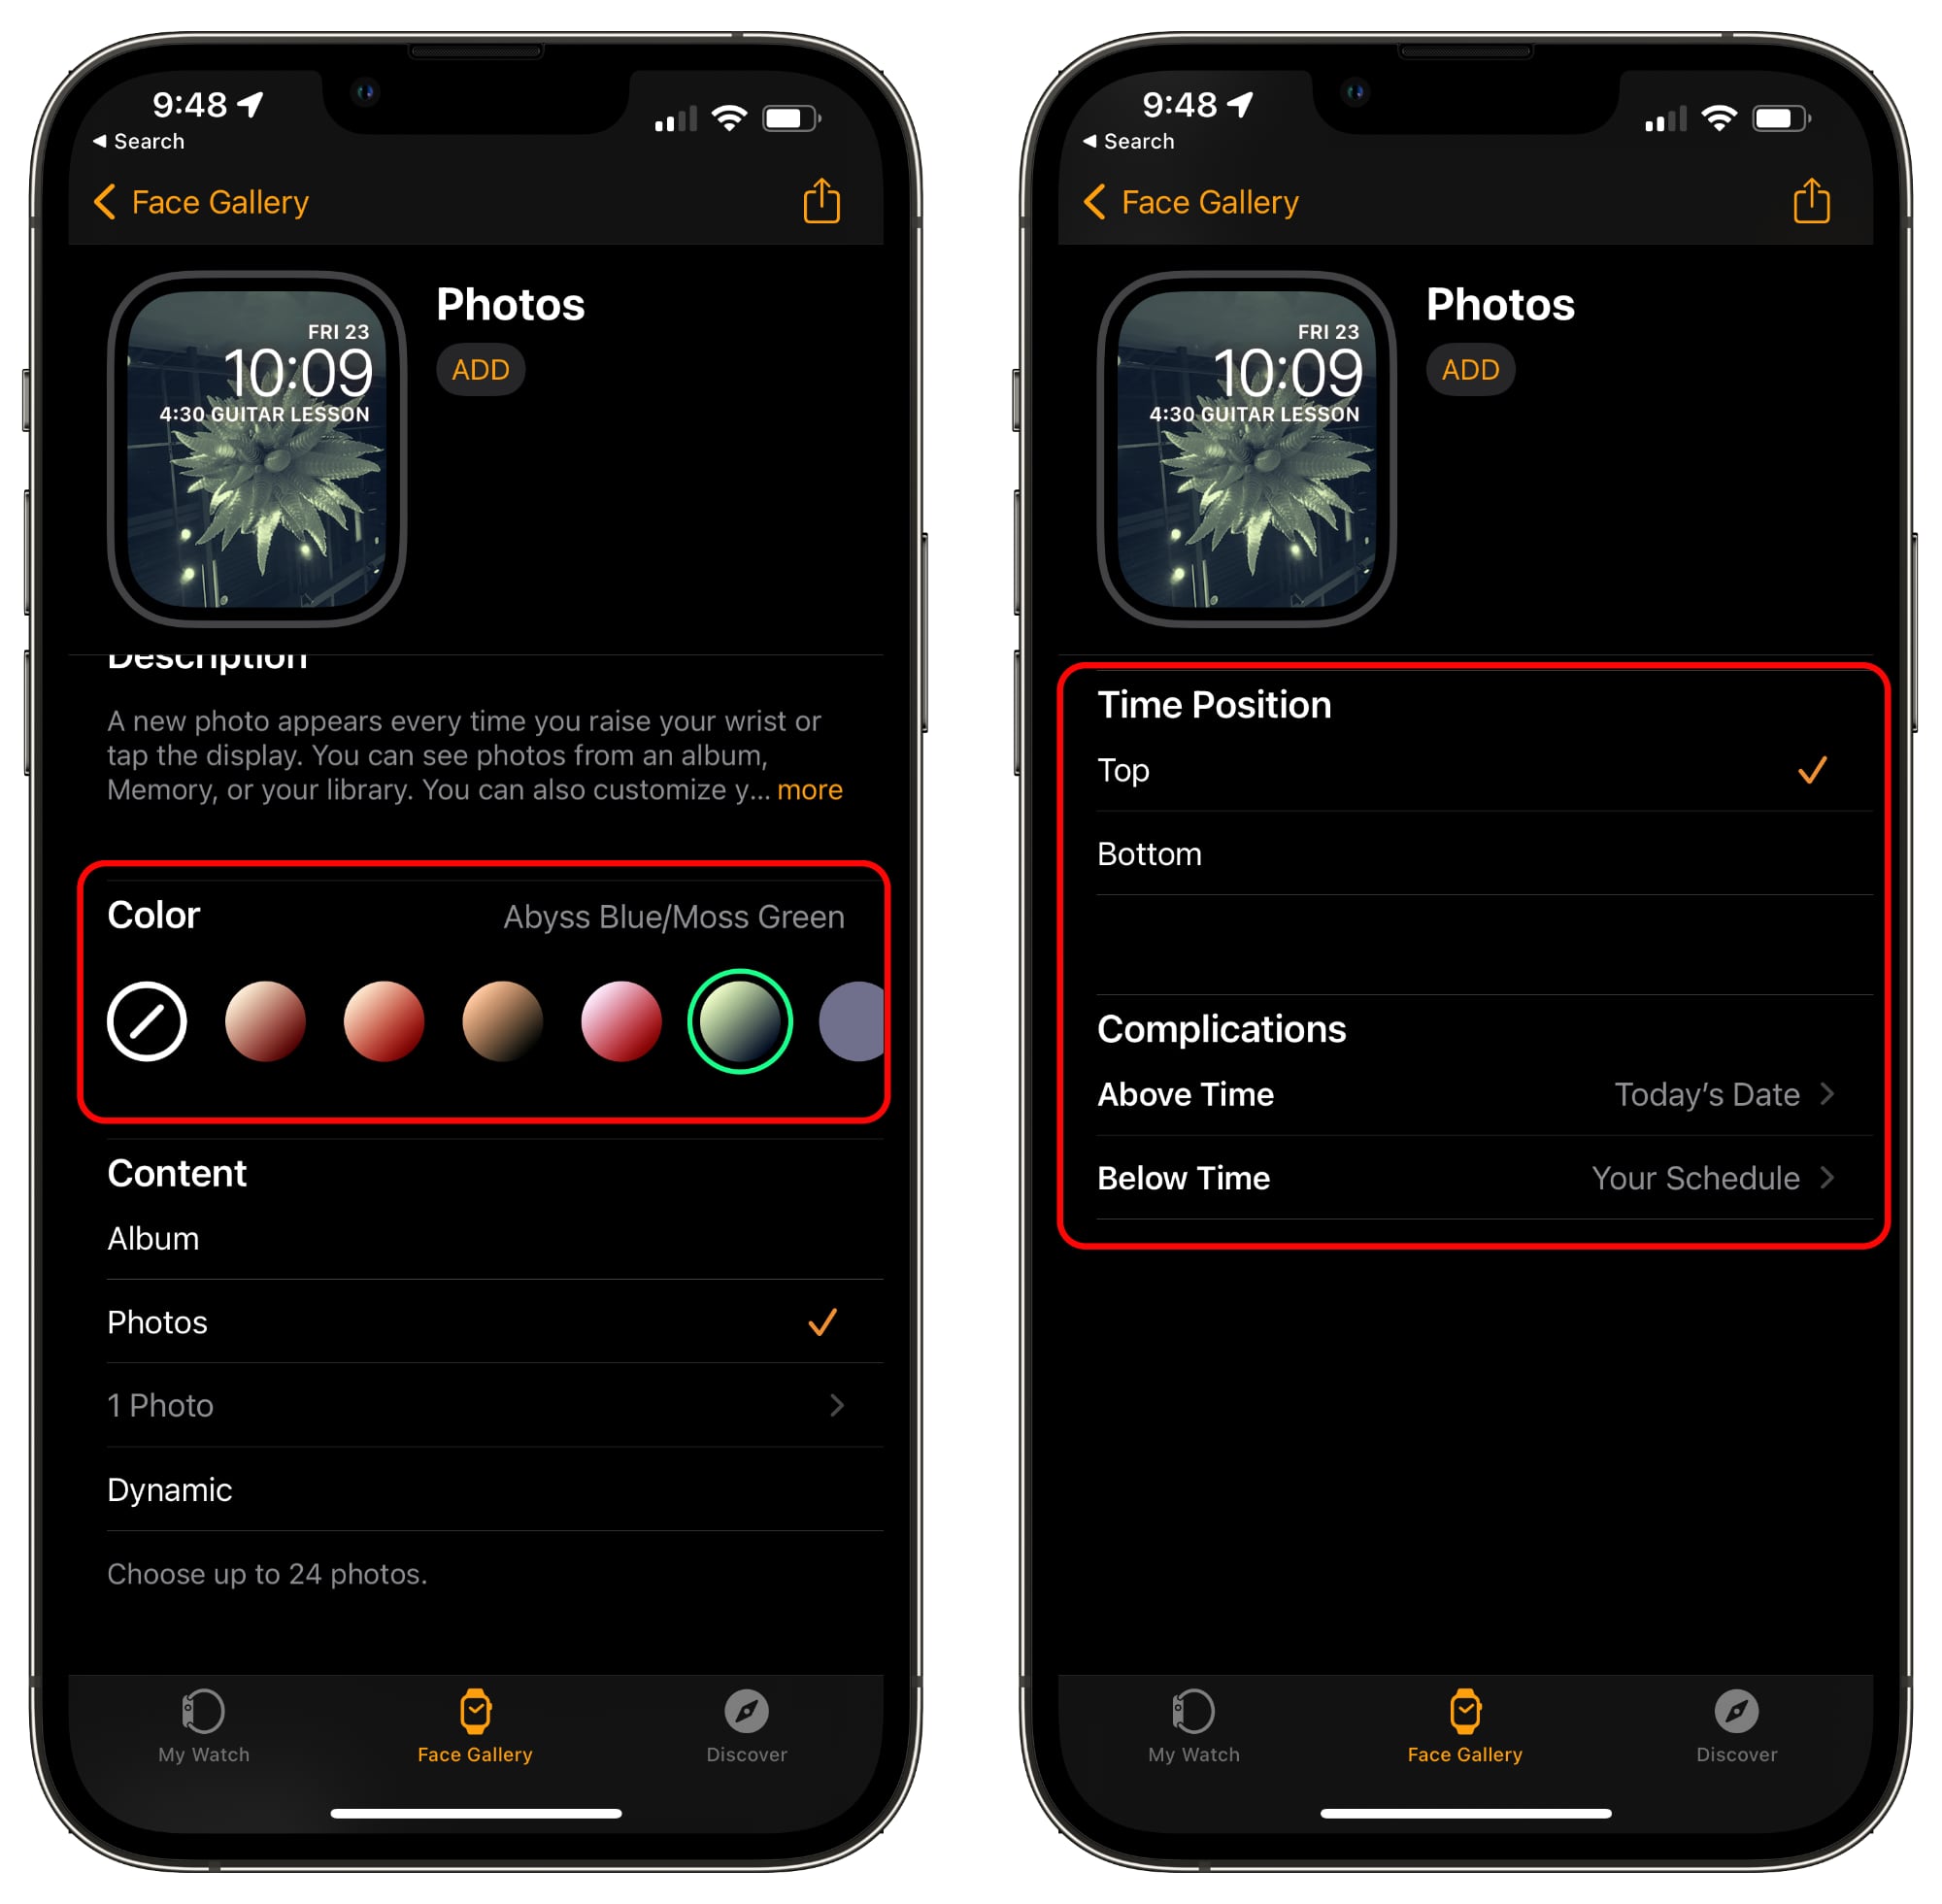
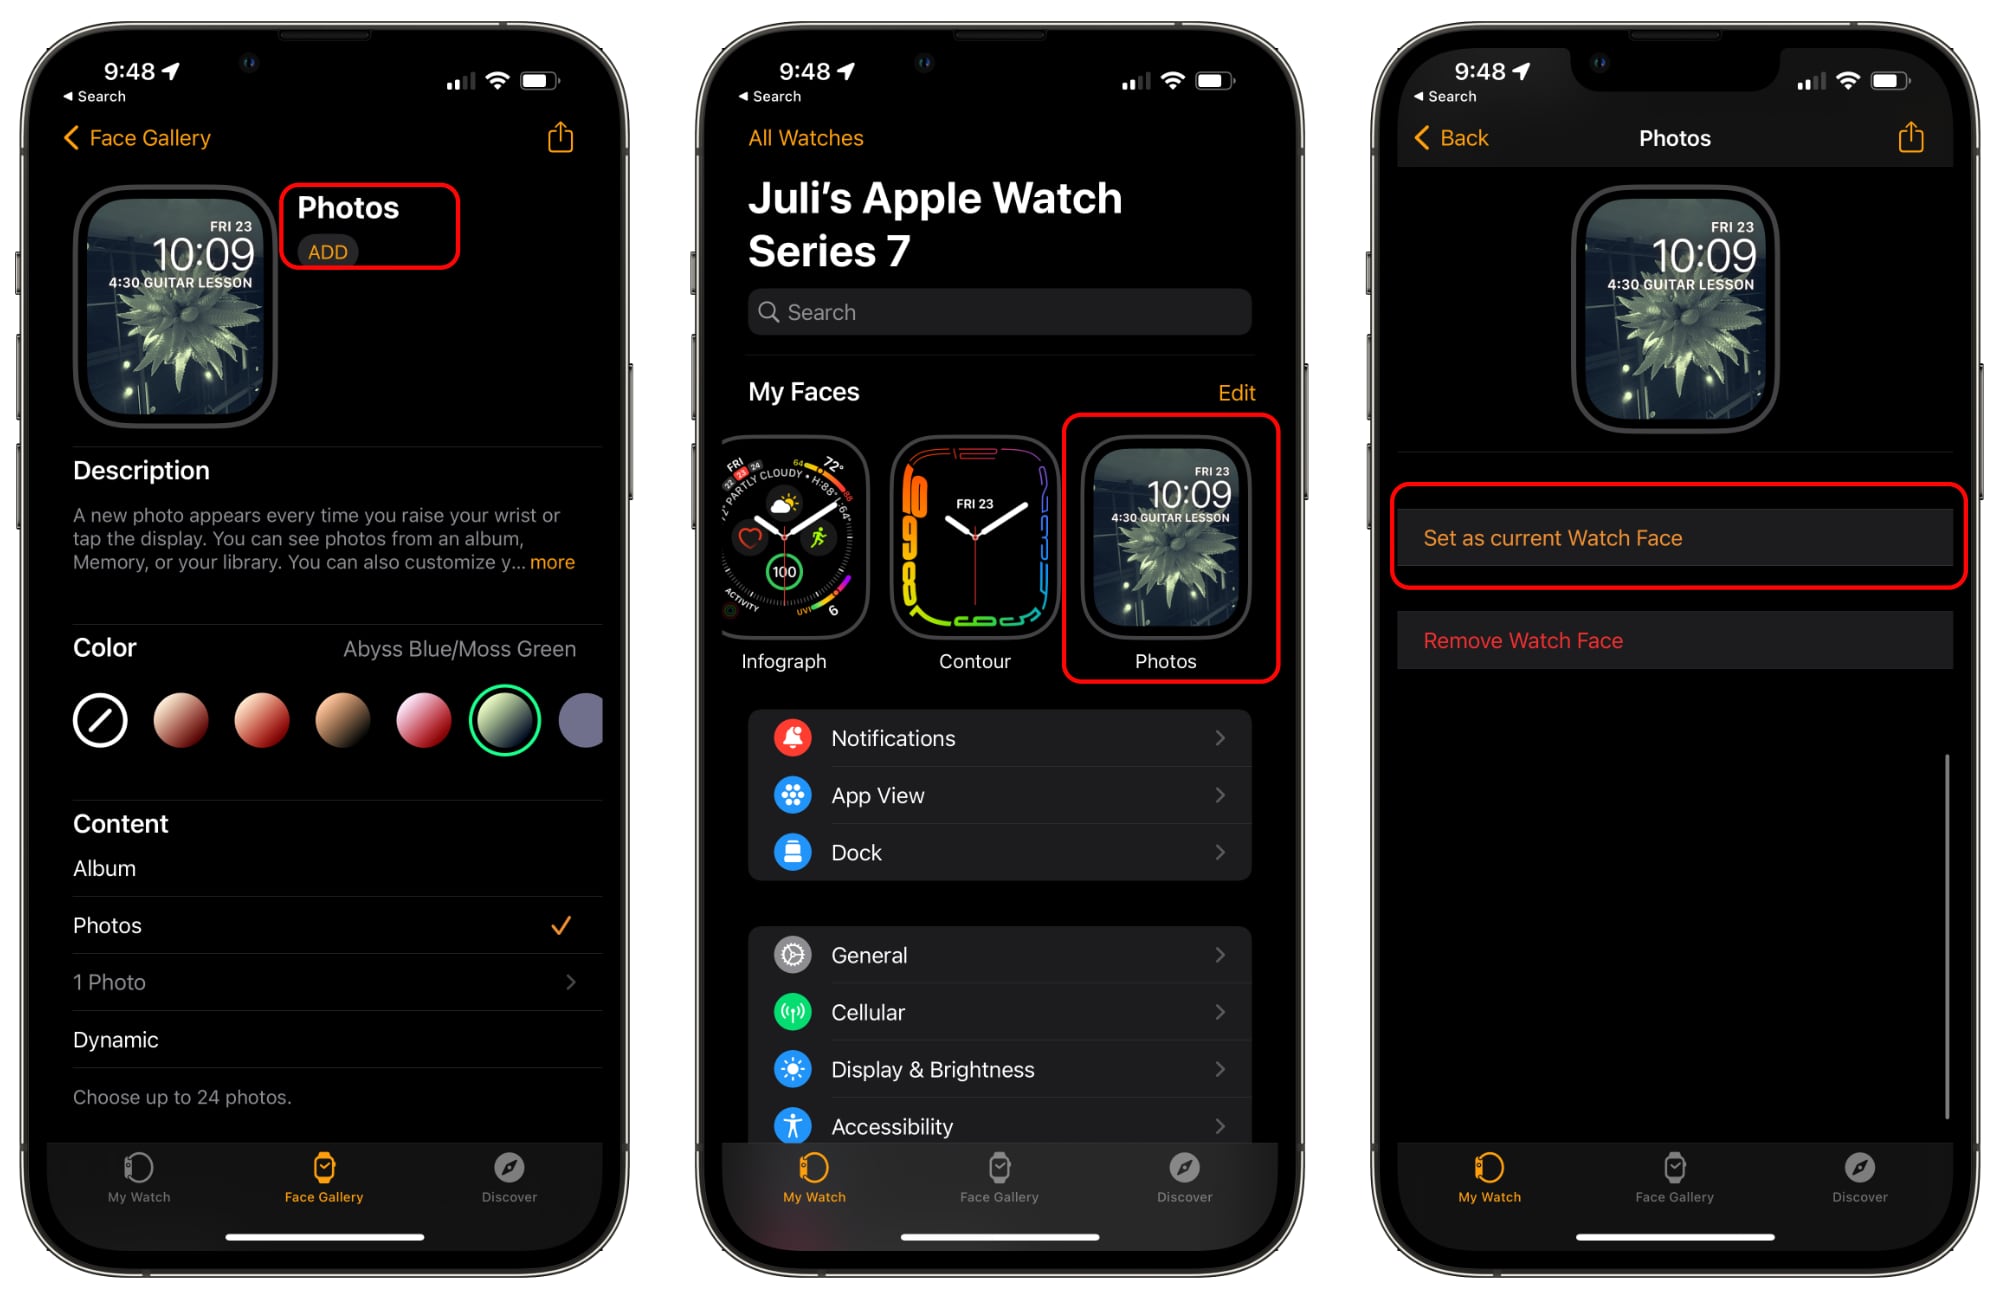
- Scroll back up to see a preview of your watch face, and tap "Add" if it looks good.
- Tap on the "My Watch" tab.
- Tap on the "Photos" watch face that you created.
- Choose "Set as Current Watch Face."
Tip: There's also a "Portraits" watch face that accompanies the Photos face. With the Portraits face, you can choose a photo that you've captured using Portrait mode and set it as a watch face. With the data from the portrait photo, there is a sense of depth to the watch face, with the time able to be placed behind the subject in some images. To set it, follow the steps above, but choose Portraits instead of Photos at step 3.
Note that this effect only works with photos of people, and not pets or objects captured in Portrait mode.
4. Set Up Express Transit
In select cities with robust transit options, there's a nifty Express Transit feature that lets you pass through a transaction gate with just a tap of your Apple Watch, with no need to wake your device or authenticate with a passcode.

Express Transit is super simple and convenient, whether you live in a city with the feature or are visiting. The feature can be set up through the Wallet app, and we have a how-to with full instructions. All you need is an iPhone and Apple Watch, and a debit or credit card linked to Apple Pay to pay for your fare.
In the United States, Express Transit is available in Chicago, Los Angeles, New York, Portland, the San Francisco Bay Area, and Washington D.C. It's also available in China, Hong Kong, Japan, Sweden, the UK, and more, with a full list available on Apple's website.
Express Transit is well worth setting up if you're in an area where it's accepted because of how quick and convenient it is. In New York, for example, if you want to get on the subway, you just tap your wrist on the turnstile and pass through. The charge goes onto your linked Apple Pay card with no other interaction from you. You don't even need a MetroCard.
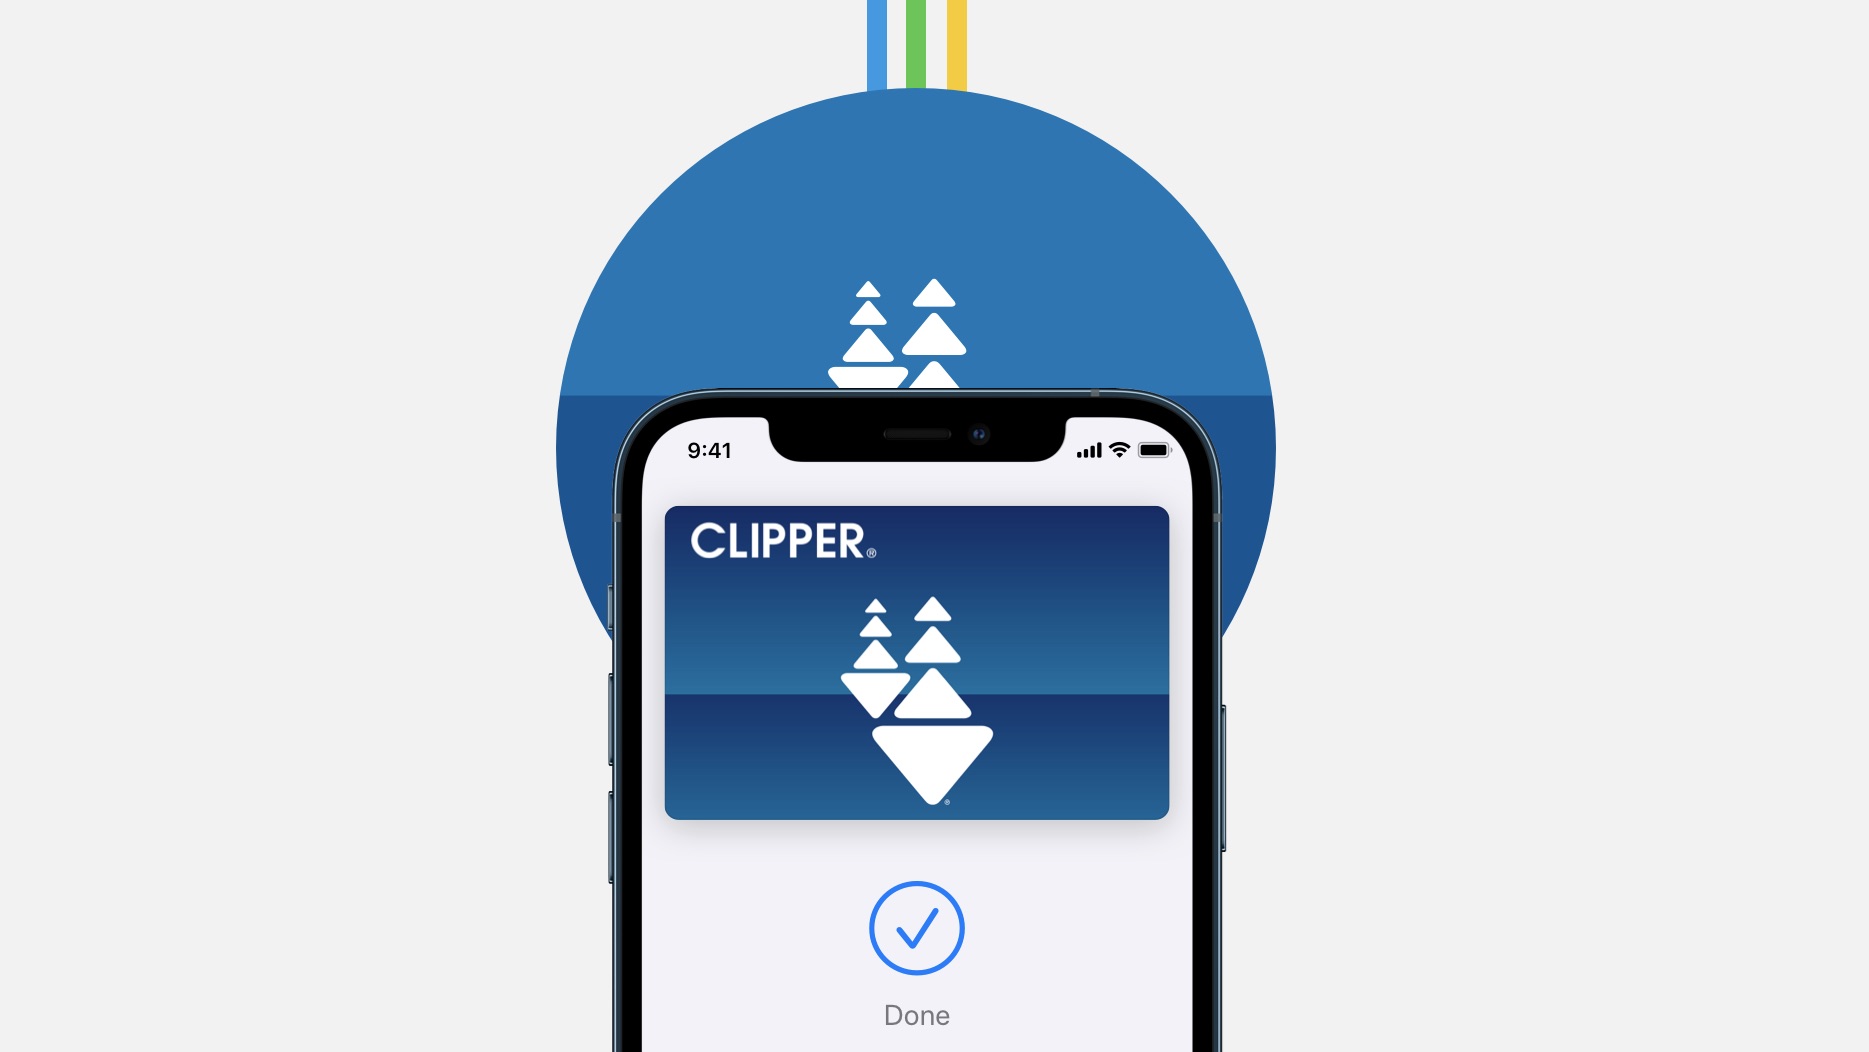
In some cities like San Francisco, you do need to add a card to your Wallet app first, which can be done by opening up the Wallet app, tapping the "+" button, selecting "Transit Card" and choosing the card for the city that you're in. After this, you can still use the Express functionality that lets you tap and go without authenticating.
You can use Express Transit with either the iPhone or the Apple Watch, but as with Apple Pay, it's most convenient to use the Apple Watch as it's right on the wrist.
5. Track Your Temperature
With the Apple Watch Series 8 and Apple Watch Ultra, there is a built-in temperature sensor that can be used to track your temperature at night. Apple added this function primarily for women to monitor their cycles and fertility, but it can be used by anyone and can be an indicator if you're getting sick.
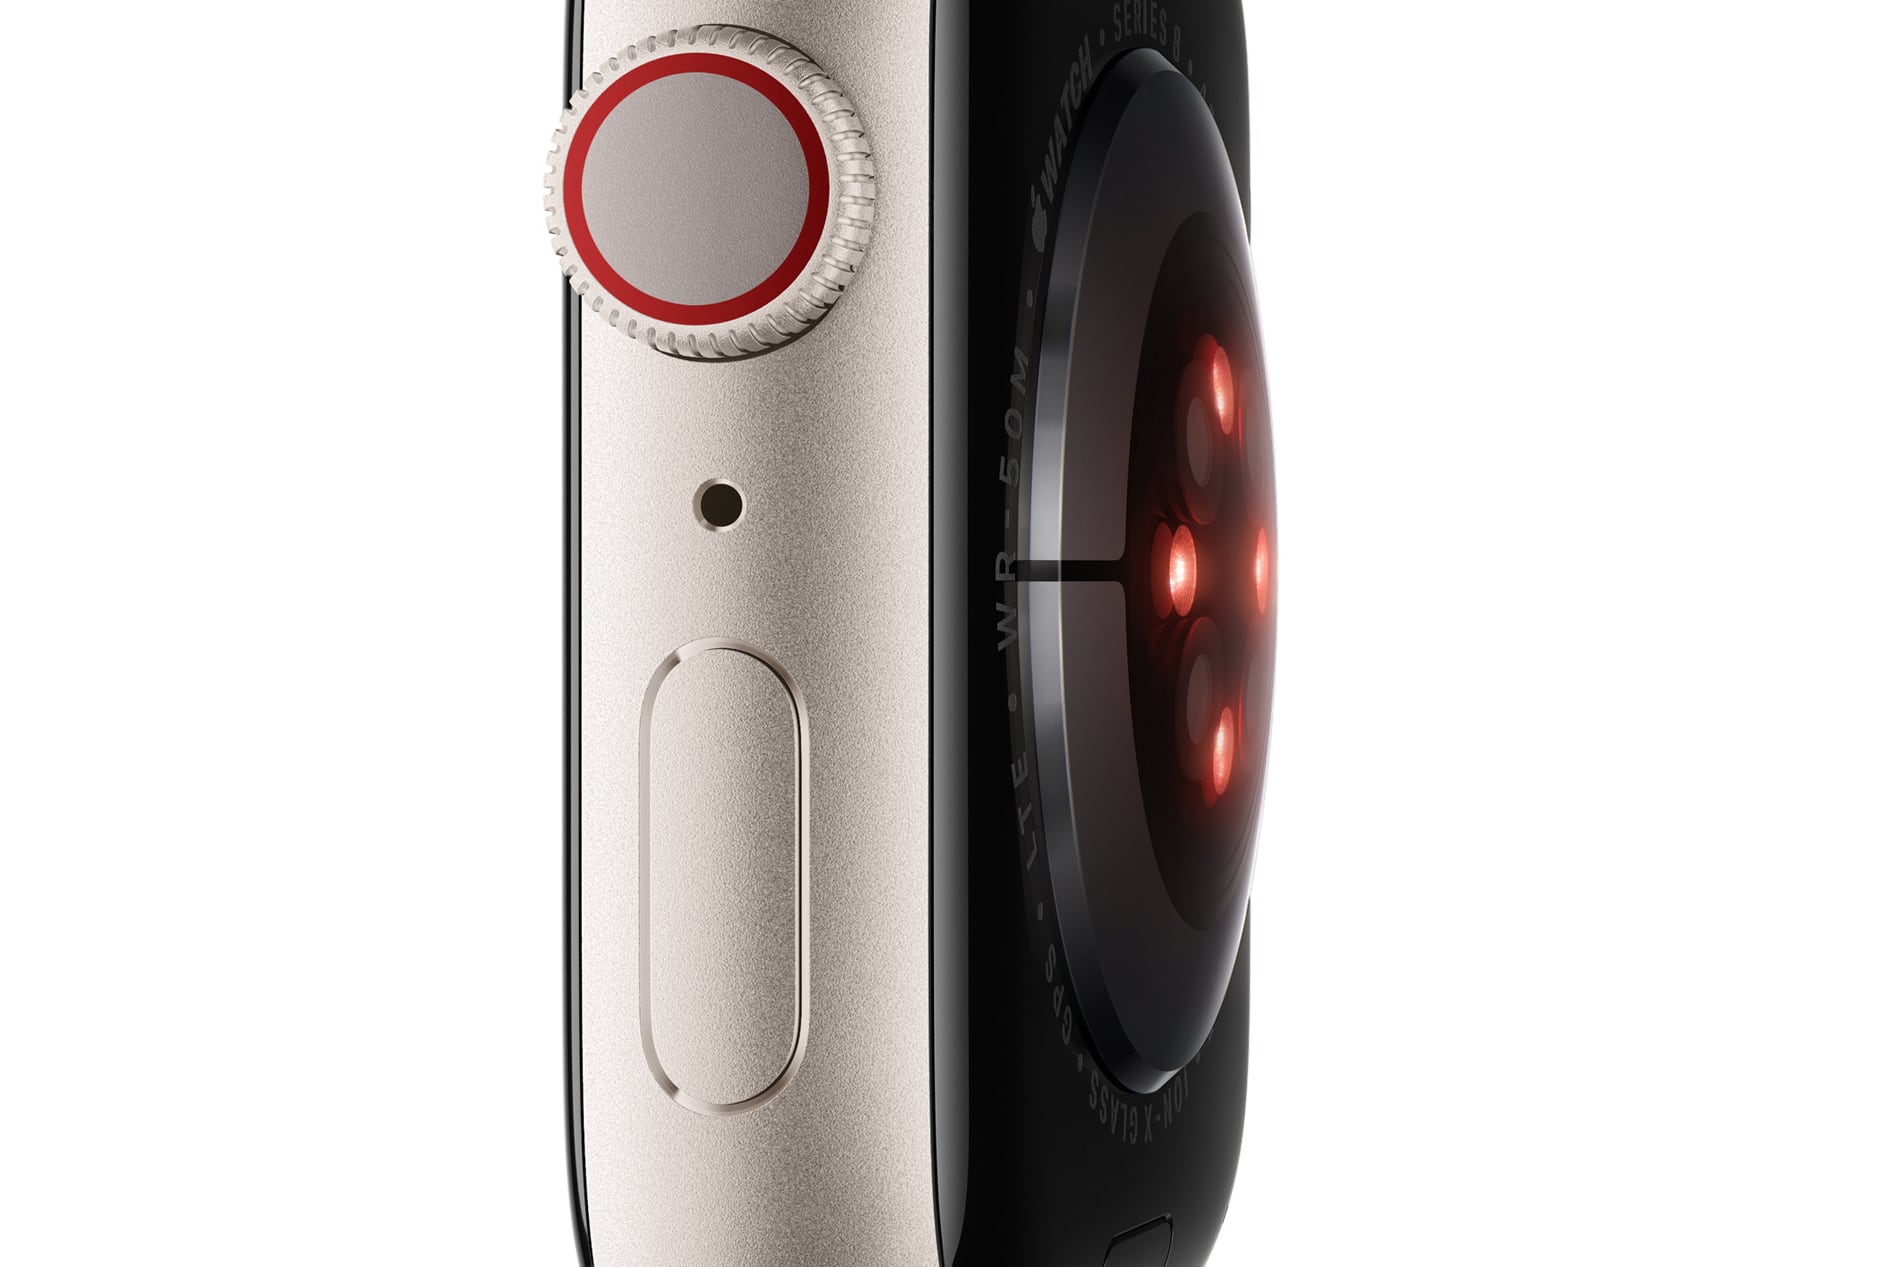
To get nightly updates on temperature, simply wear your Apple Watch to bed with sleep tracking enabled. Your device will take periodic temperature readings, which you can then view in the Health app.
- On your iPhone, open the Health app.
- Tap Browse, then tap Body Measurements.
- Tap Wrist Temperature.
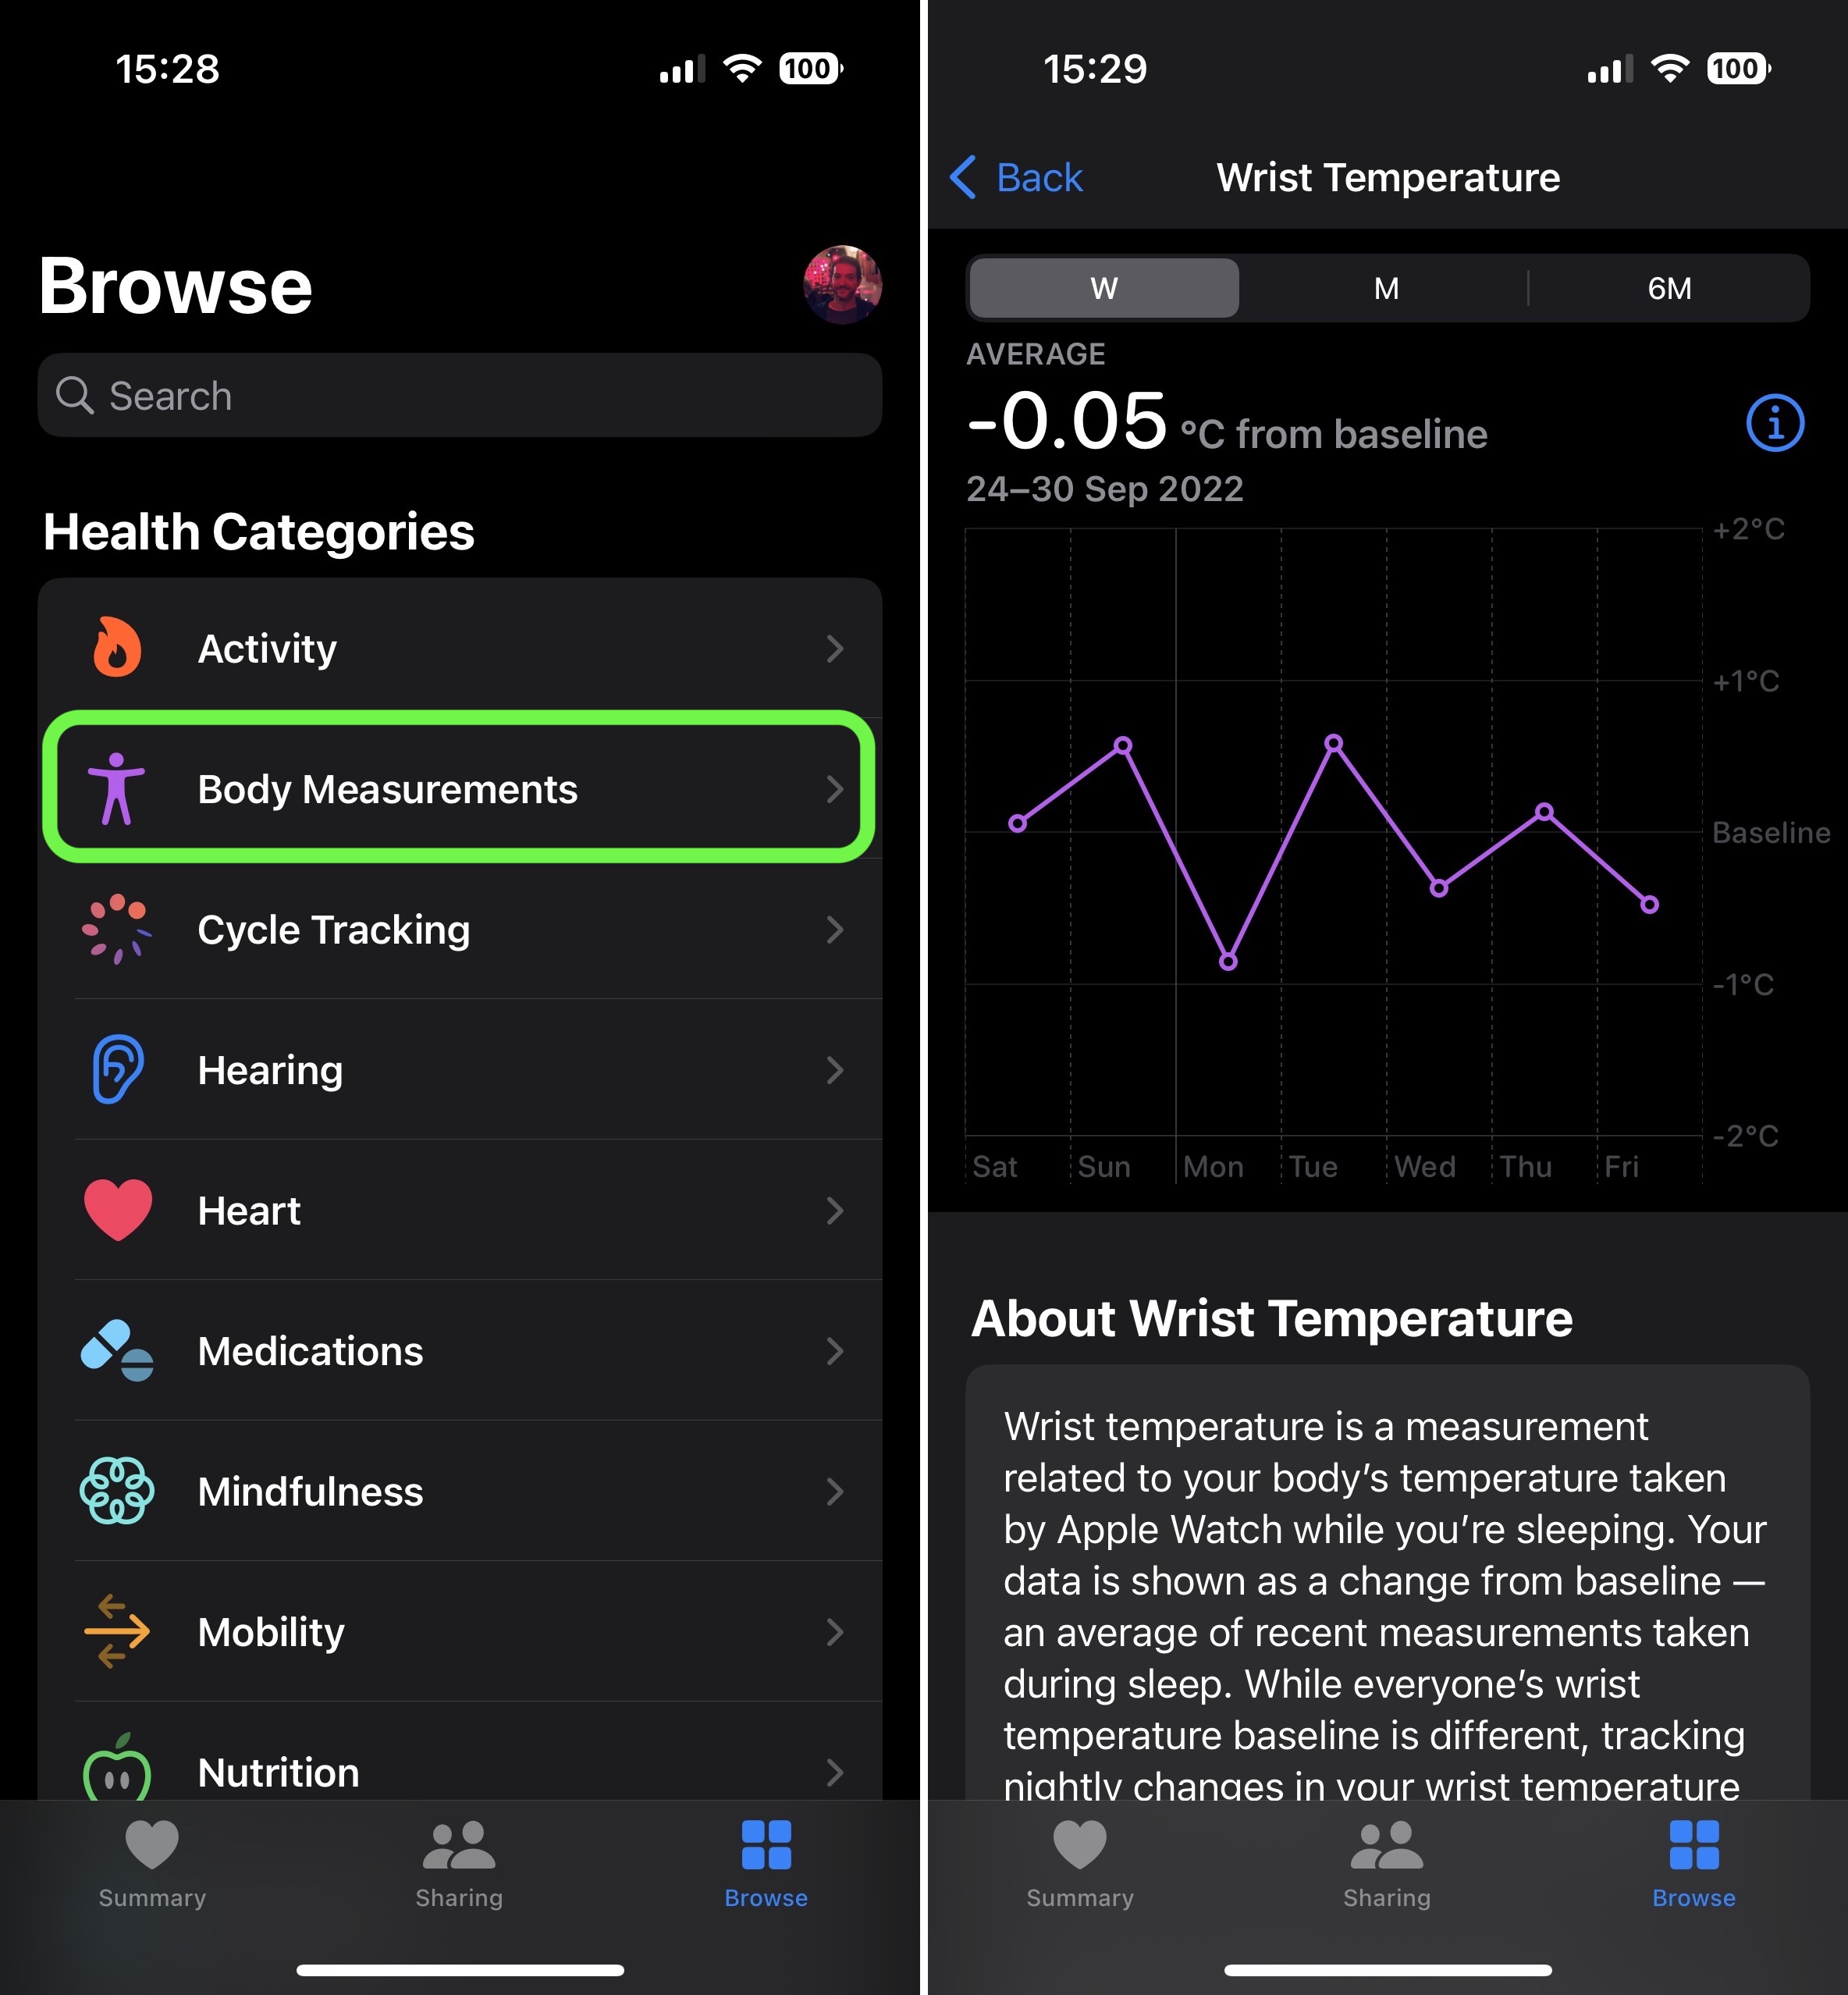
If you see "Needs More Data" at the top of the chart, your baseline temperature has not yet been established and you'll need to wear your Apple Watch for more nights. The number of nights required will be displayed below the chart.
Note that Apple warns that the Apple Watch temperature sensing feature is not intended for medical purposes as wrist temperature is not as accurate as other temperature sensing methods.
6. Control Your Apple TV With Your Watch
If you have an Apple TV set-top box, you can control it using the Remote app on your Apple Watch, which is useful if you lose your remote.
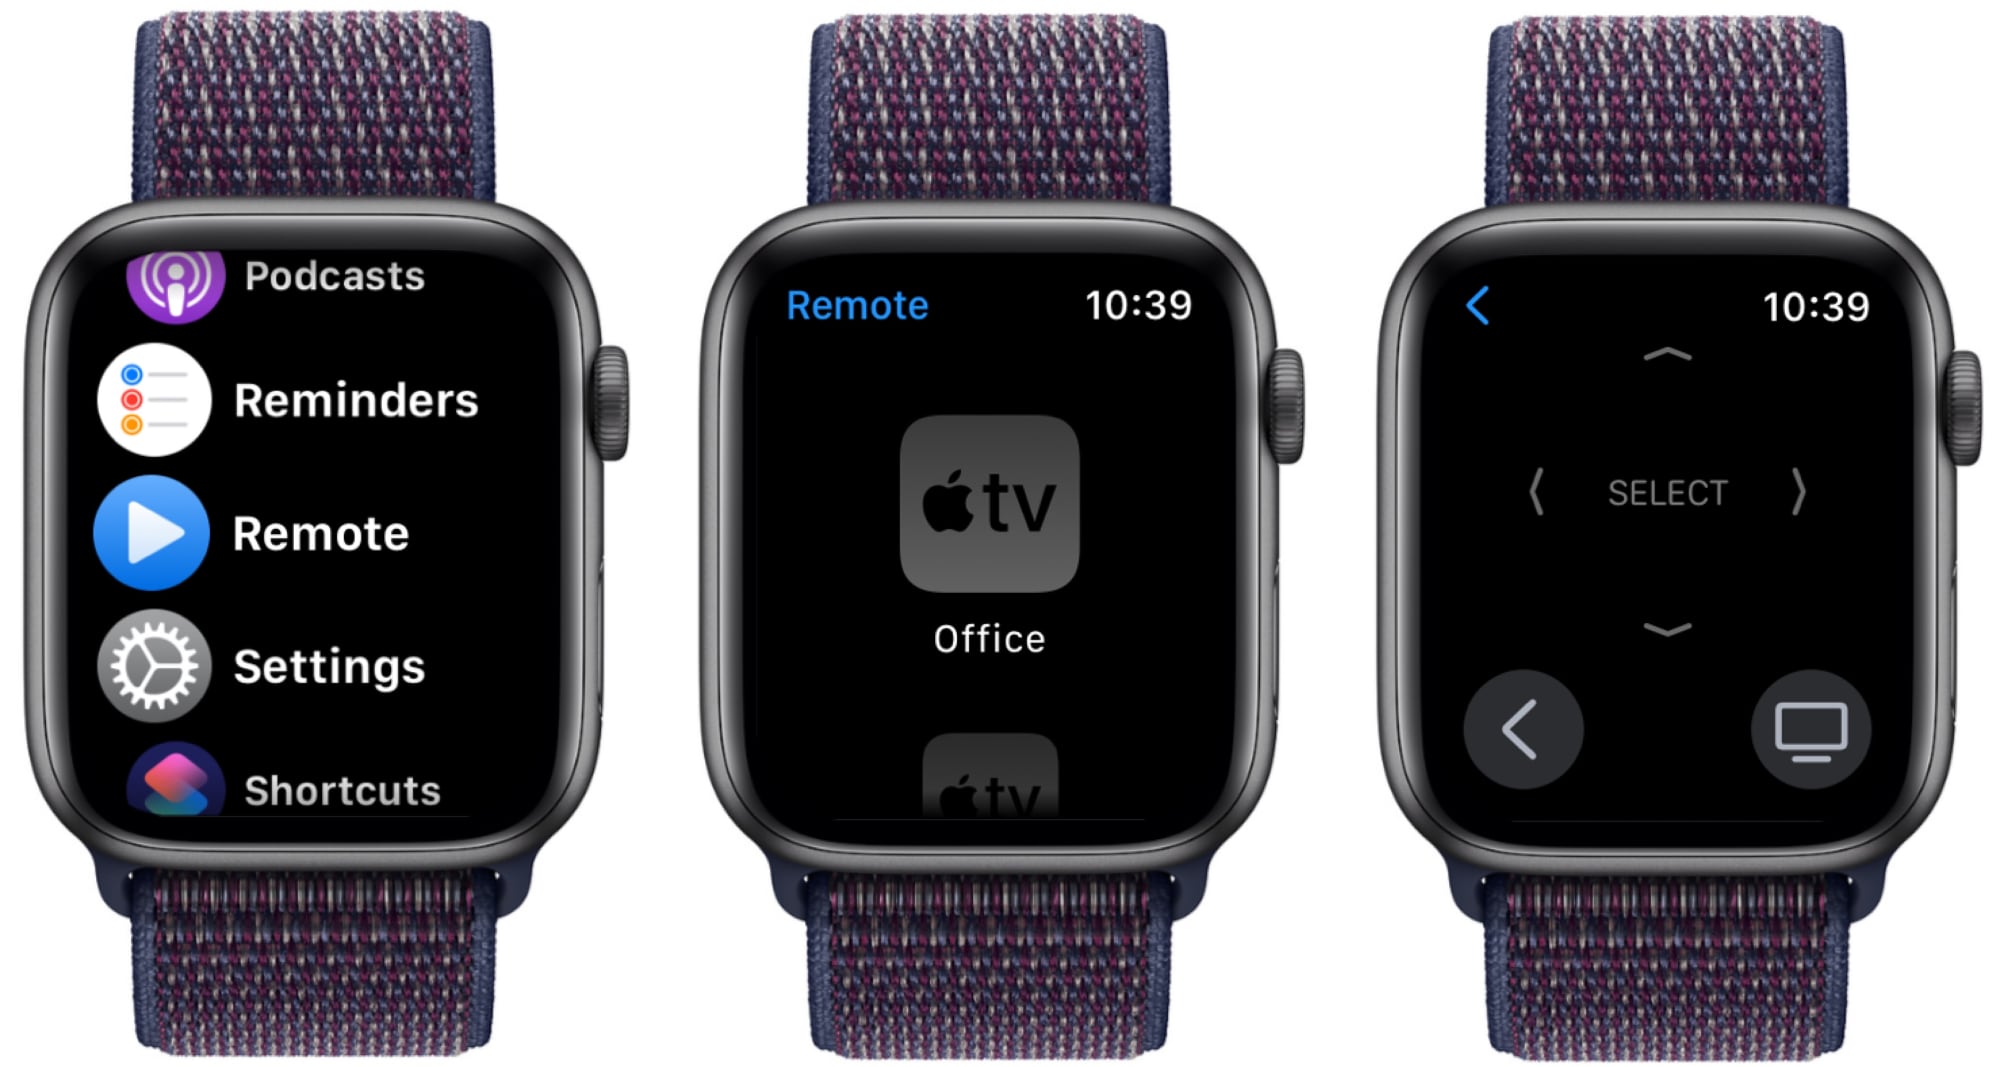
- Press on the Digital Crown to get to your App List or App Grid, depending on your App View.
- Find the "Remote" app, which is labeled as Remote and has a blue icon with a triangle in the center.
- Tap it.
- Wait a moment as the watch syncs to the Apple TV sets in your home.
- Select the Apple TV you want to control.
From there, you can turn on the Apple TV by tapping on the little TV icon in the bottom left of the display, and scroll through the interface using swipe gestures. To launch an app or make a selection, just tap.
Tip: Tap on the "+" button to add an Apple TV that your watch is not linked to and go to Settings > General > Remotes on the Apple TV set. The Remote feature is compatible with the third-generation Apple TV and later.
7. Get Help in an Emergency
If you want to be able to get help quick in an emergency, you can enable an SOS feature on the Apple Watch that calls emergency services with the press of a button.
- Open up the Settings app on the Apple Watch.
- Scroll down to "SOS."
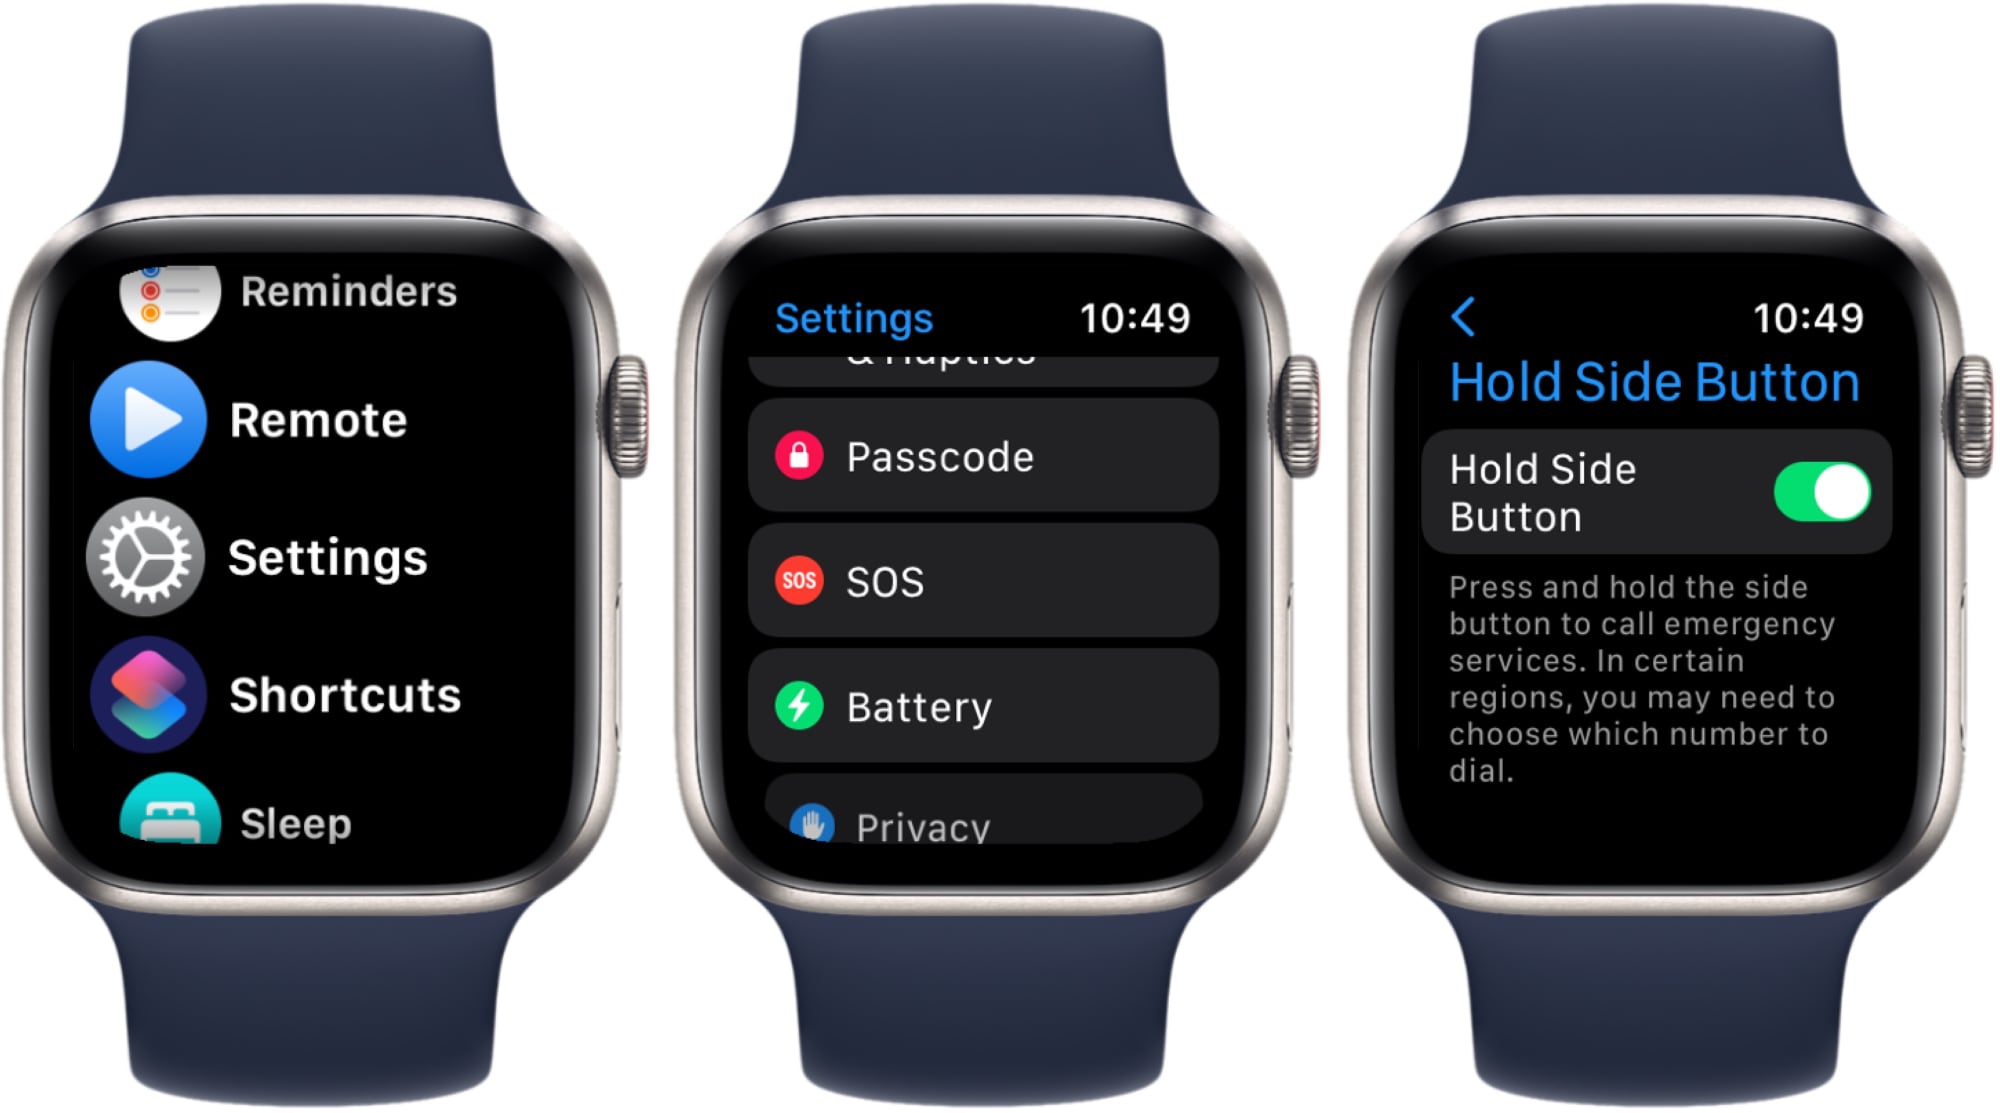
- Enable "Hold Side Button."
With the SOS feature toggled on, your Apple Watch will begin dialing emergency services in the country where you're located if you hold down the side button. The side button is the rounded rectangular button below the Digital Crown.
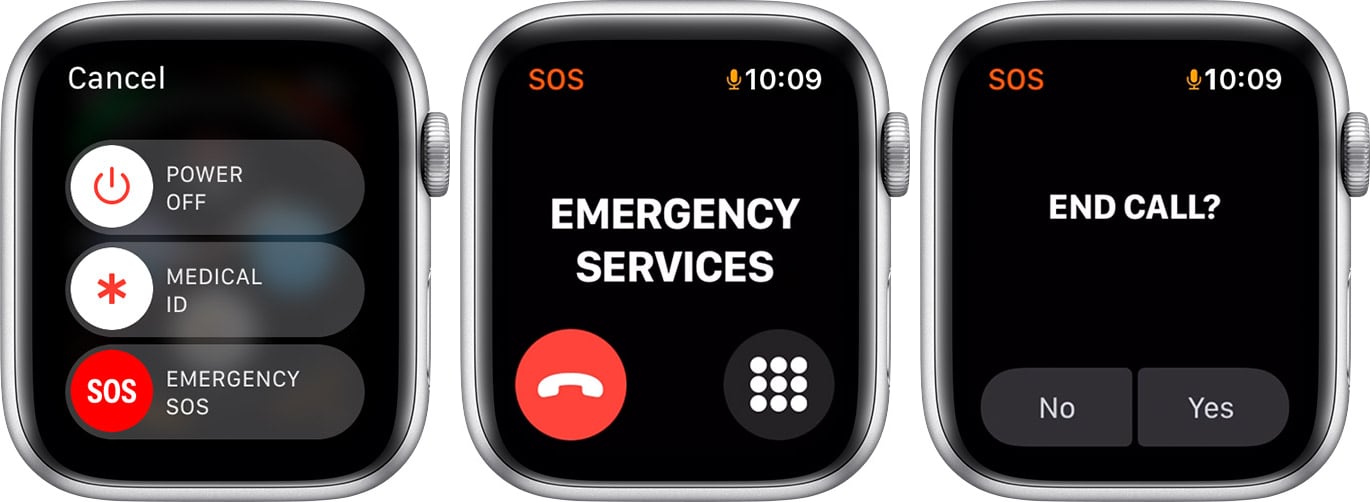
Holding it down calls emergency services, but you will have a countdown to stop the call in case it gets activated by accident.
Tip: If you want the Apple Watch to be able to automatically call emergency services if you take a hard fall, enable Fall Detection in this same section, and make sure Crash Detection is turned on too. If you slip and are knocked unconscious or have an accident on a bike, skateboard, car or other mode of transportation, your Apple Watch can get you help.
8. Remove Apps From Your Apple Watch
If you have a bunch of apps on your Apple Watch that you don't need, you can get rid of them.
- Unlock your Apple Watch and go to the App View.
- Long press on the Apple Watch display.
- Tap on "Edit Apps."
- Scroll through the list or swipe through the grid (depending on your view choice) to locate apps you don't want.
- Tap on the small "x" on the app to delete an app or swipe to get to the delete interface if you use the List view.
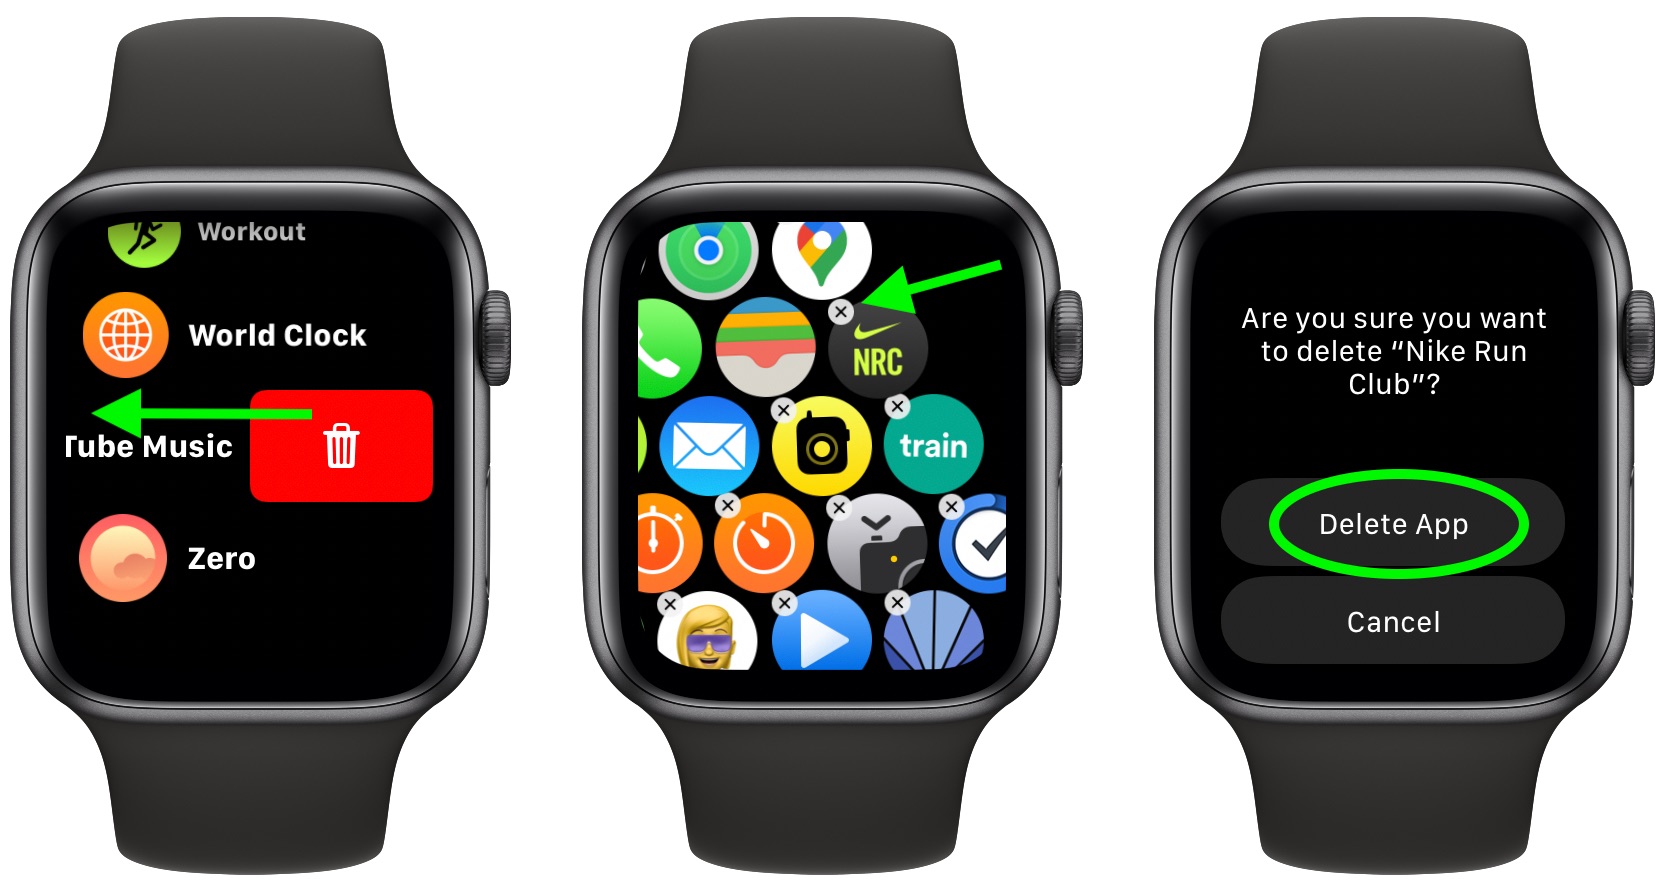
- Confirm that you want to delete the app.
Note that there are core apps that cannot be removed from the Apple Watch like Activity, Compass, App Store, Heart Rate, Maps, Mail, and Messages, but there are a number that can be eliminated for a cleaner look.
You can remove Alarms, ECG, Blood Oxygen, Memoji, Find Items, Cycle Tracking, Mindfulness, Sleep, and other similar apps. If you want them back later after deleting them, you will need to redownload them from the App Store.
9. Share a Photo From Your Watch
You can share photos right from your wrist without having to open up your iPhone, which is handy for a quick image transfer. If you come across an image on your watch that you want to share, you can send it to someone else right from your wrist.
- Open up the Photos app on the Apple Watch.
- Select a photo that you want to share and tap it.
- Tap on the small share icon on the bottom right of the photo.
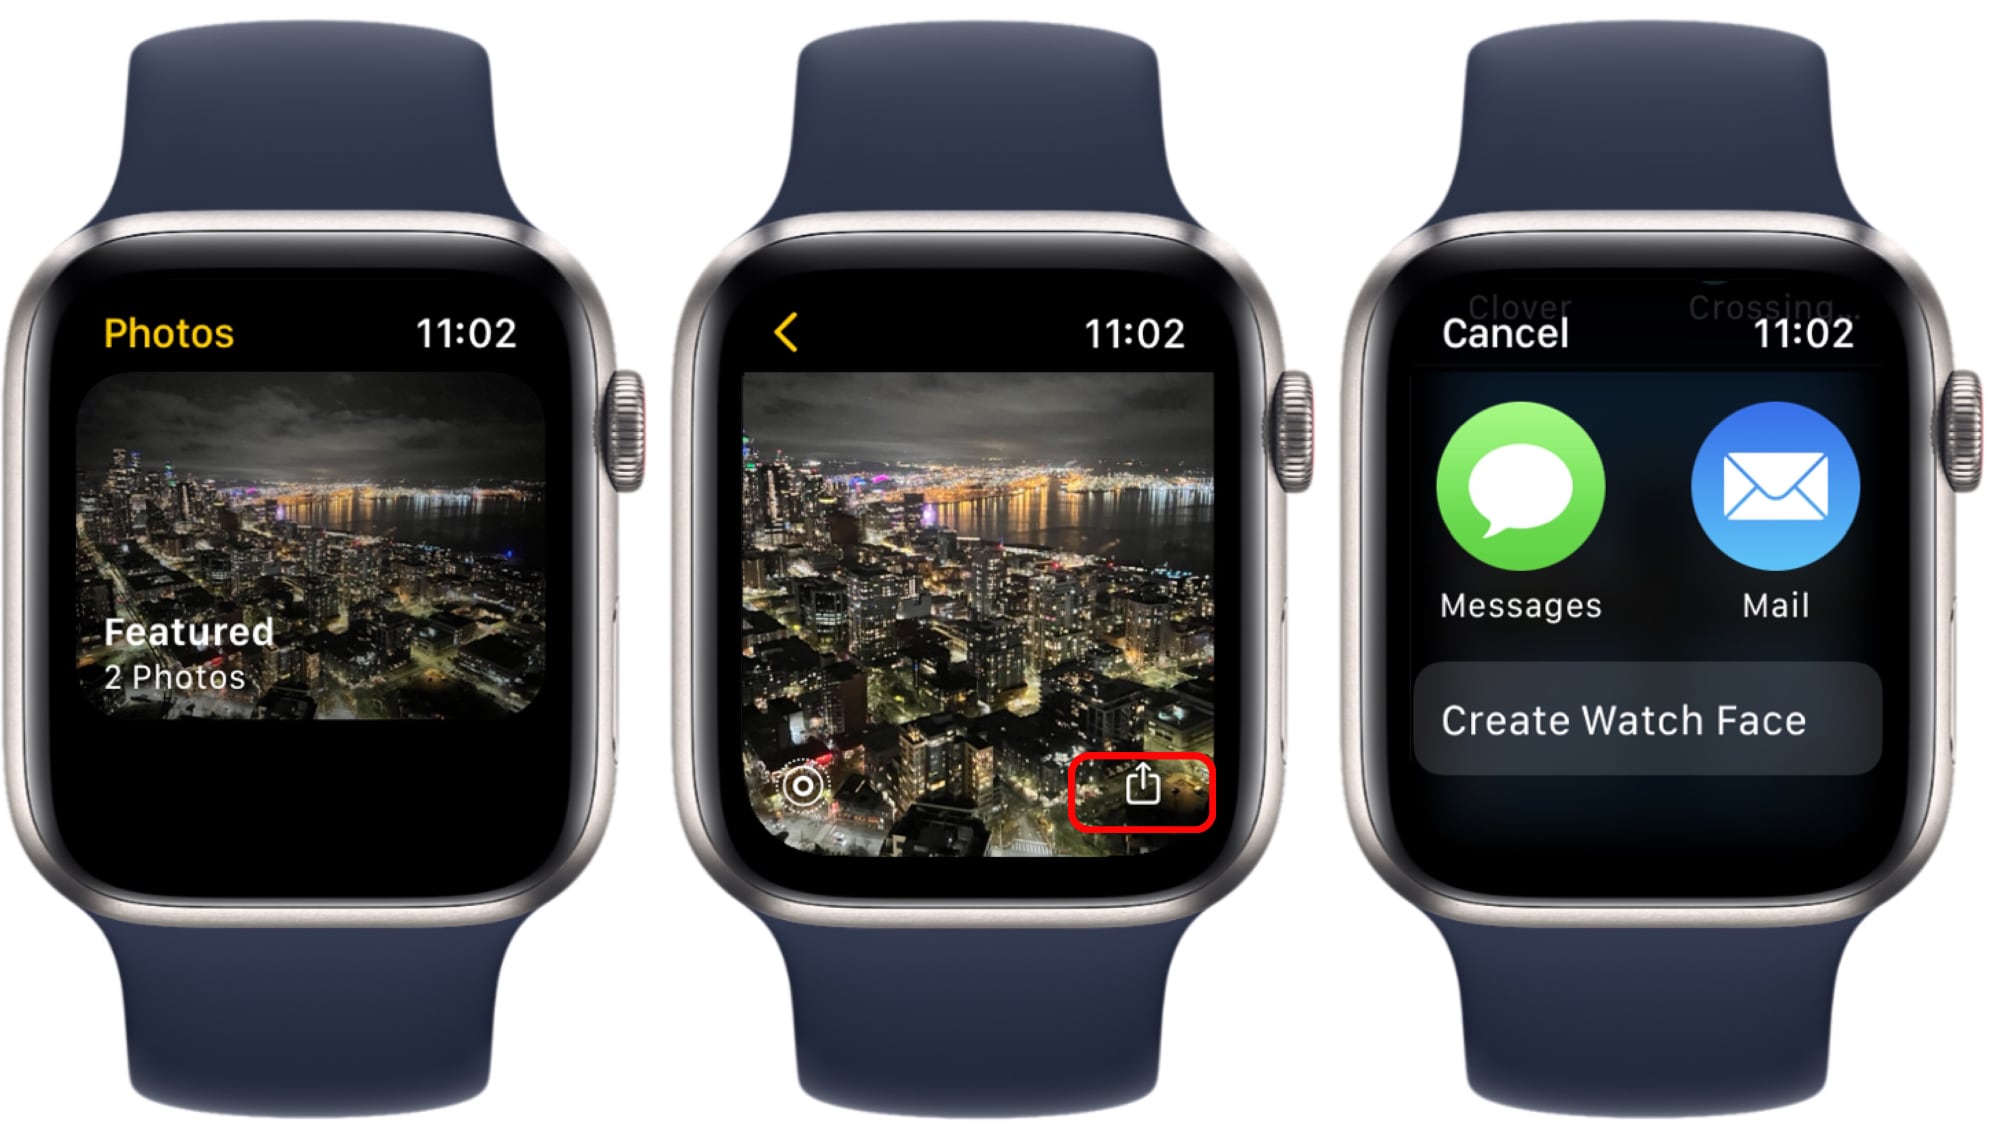
- Apple will offer your most recent contacts to send it to, or you can scroll down and send it to anyone using Messages or Mail.
- Select a contact, and then write a message if you want to add one.
Tip: The Photos app on Apple Watch can display one album from your iPhone photos. To change it, open up the Watch app on iPhone, scroll down and select Photos, and tap on "Sync Album" to choose an album to sync to your Apple Watch.
You can sync up to 500 photos, but be aware that the number of photos that you choose affects the storage space on your Apple Watch. In the Watch app under Photos, you can also choose to sync memories and sync featured photos. With these options enabled, your featured memories and images will show up in the Photos app, and the selection will change daily.
10. Make Apple Watch Text Larger
Apple Watch text can be tiny, especially on the smaller 40 and 41mm Apple Watch models. You can make it bigger by following these steps:
- Open up the Settings app on Apple Watch.
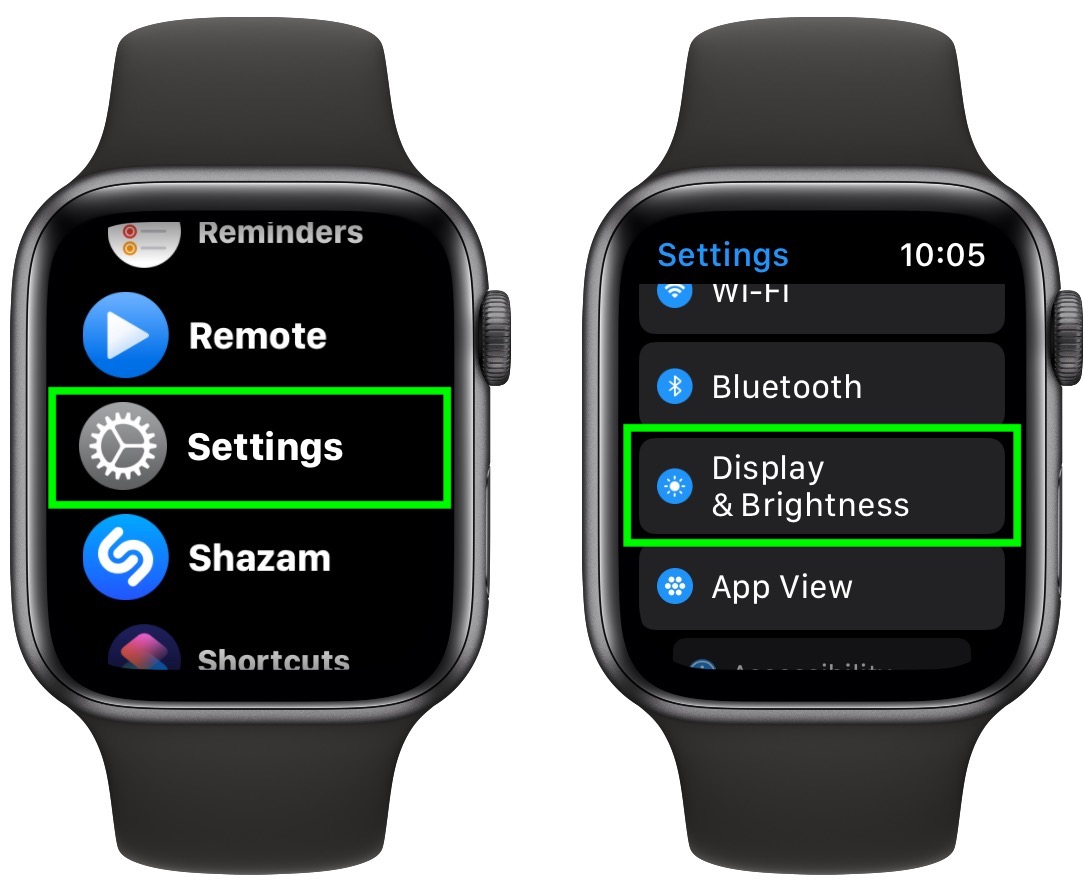
- Scroll down to "Display & Brightness" and tap it.
- Tap on "Text Size."
- Tap on the "Aa" on the right side of the display to make the text bigger, and tap on the "Aa" icon on the left side to make it smaller again.
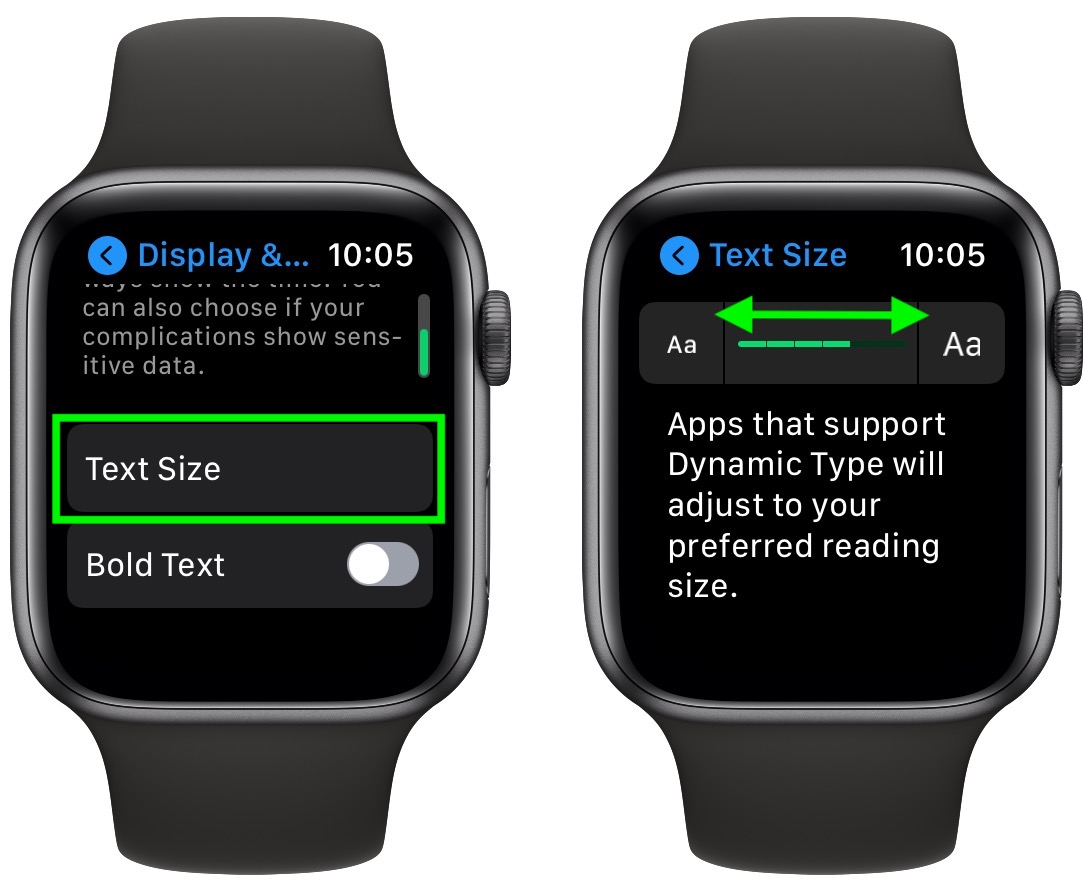
When you adjust the text size, any app that supports Dynamic Type will show your preferred text size. If you want to make text even more visible, toggle on the "Bold Text" option below text size.
11. Get Even More Battery Life on Apple Watch Ultra
For those with Apple's high-end Apple Watch Ultra, you can get up to 60 hours of battery life, which is great for multi-day usage without needing to charge.
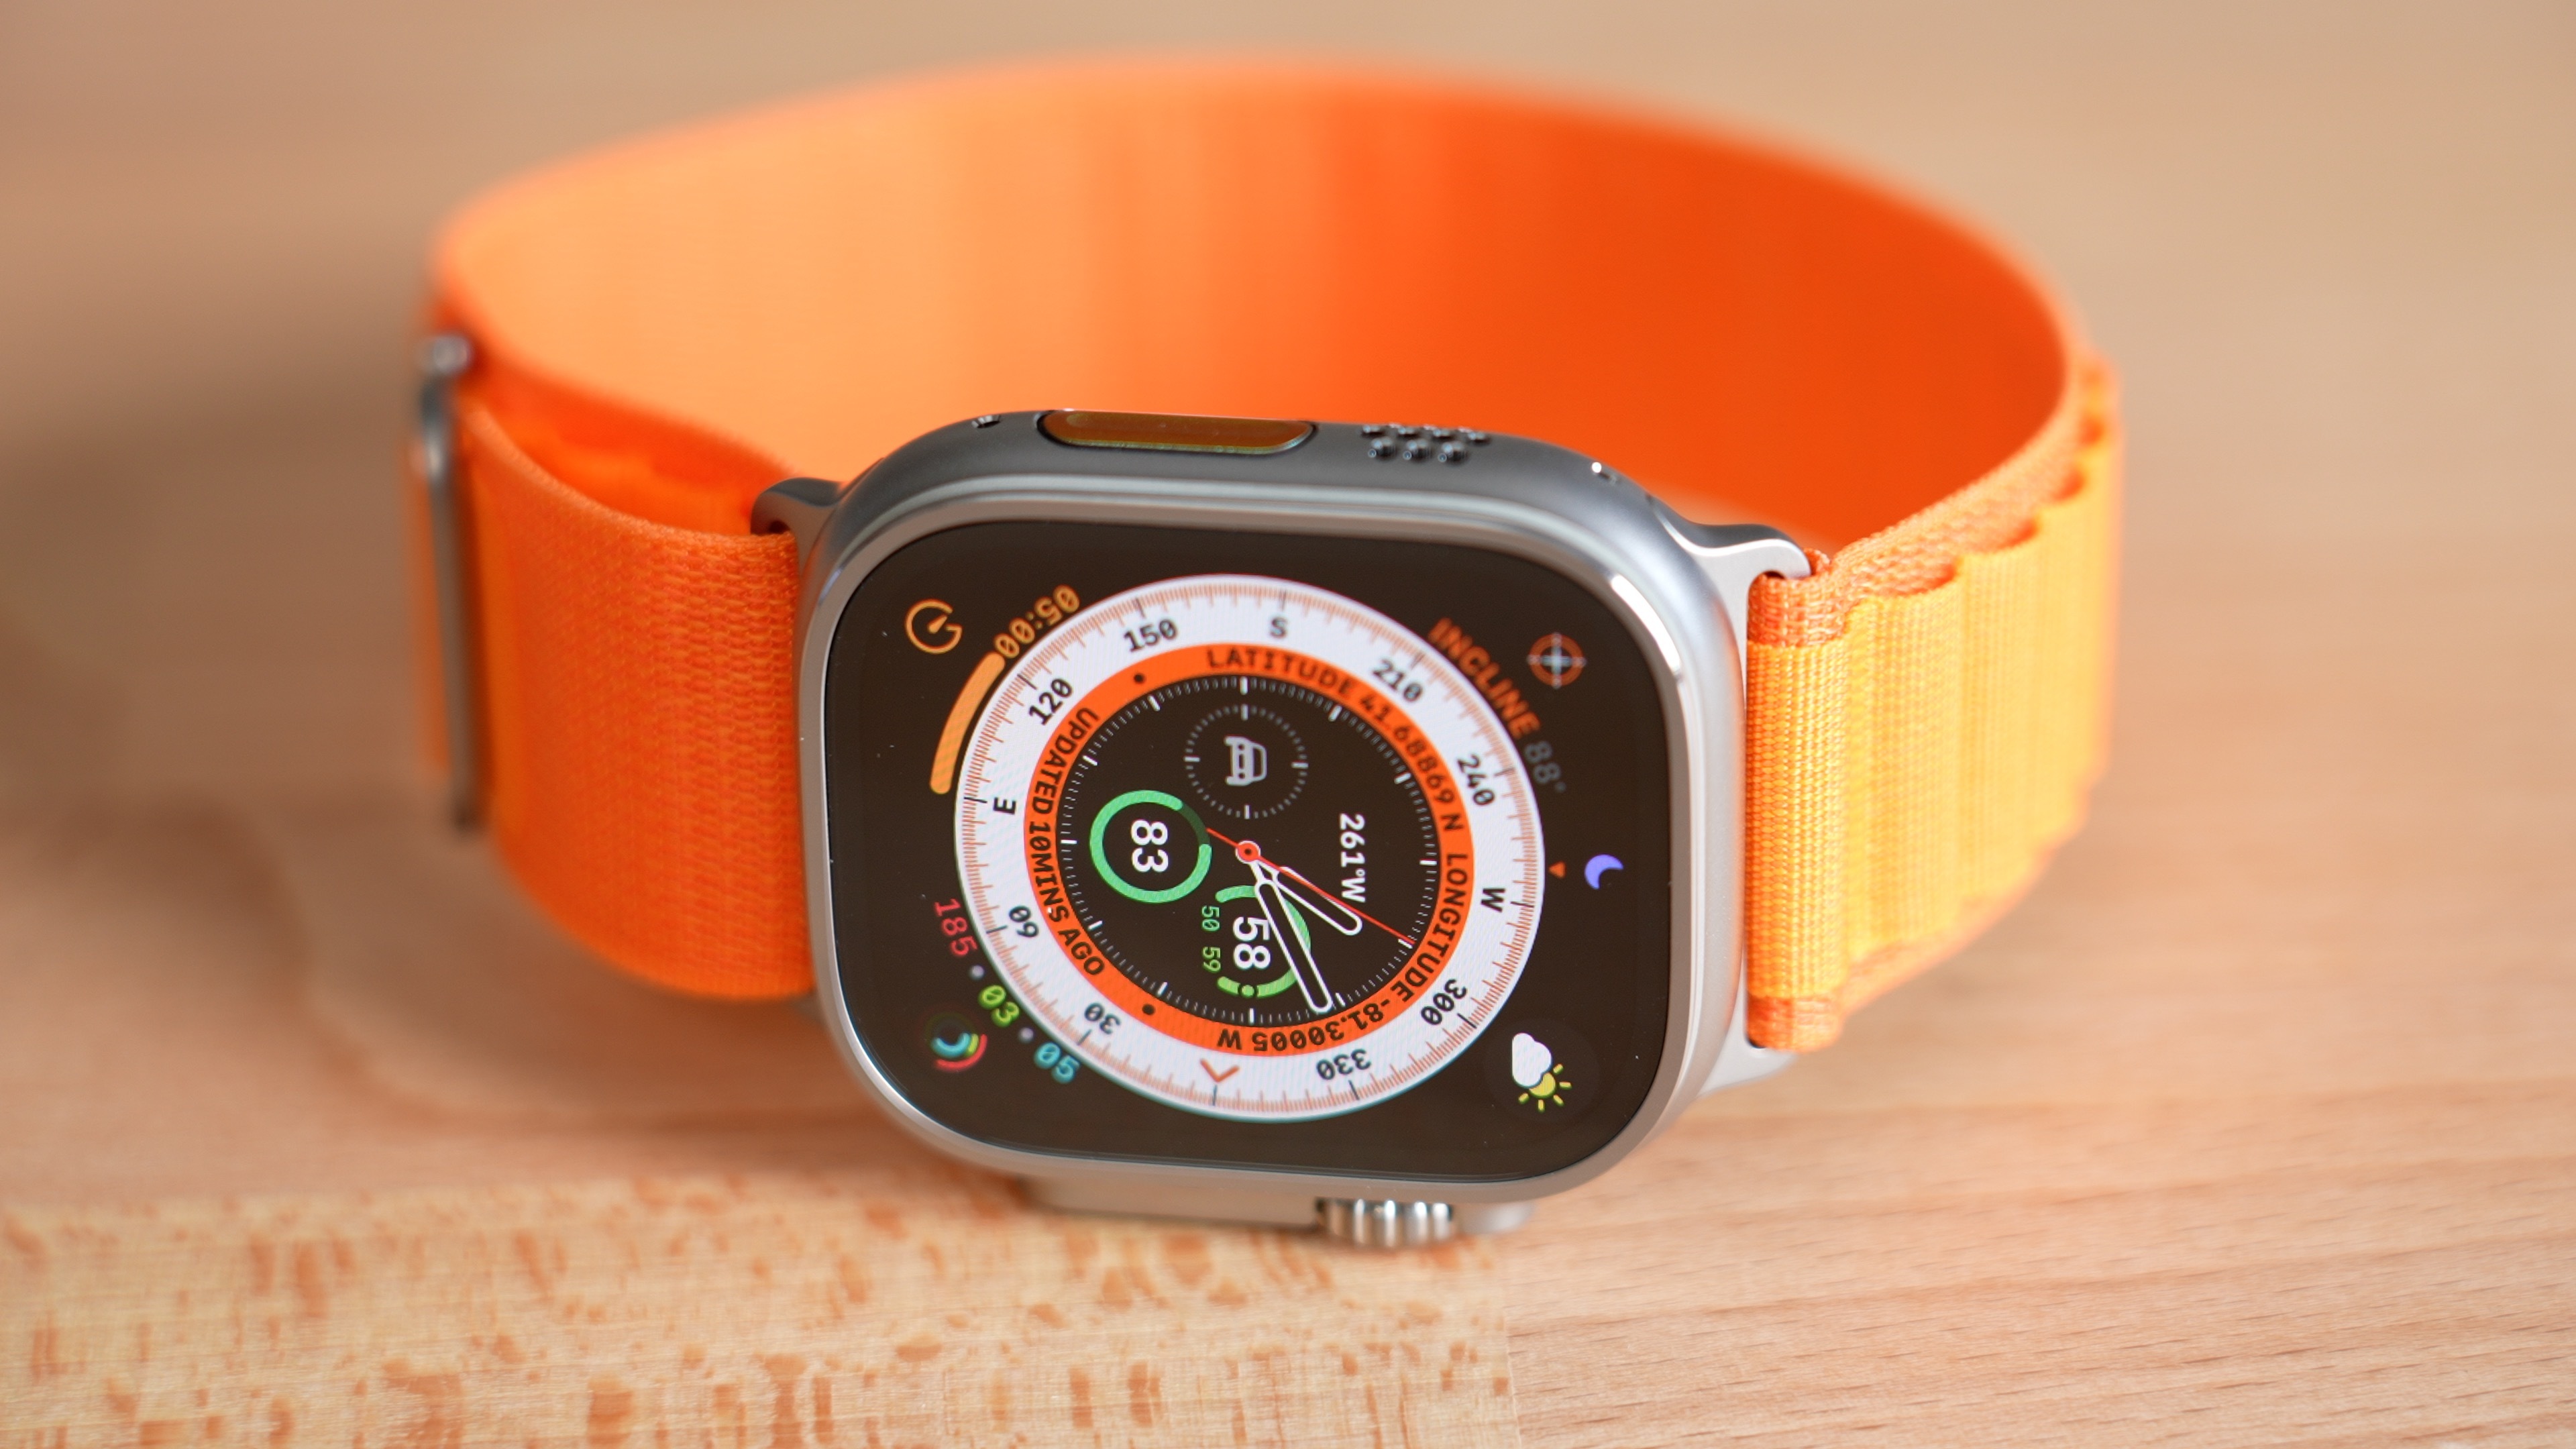
This functionality is enabled through a combination of Low Power Mode and additional battery saving settings for Workouts. 60 hour battery life is exclusive to the Apple Watch Ultra thanks to its larger battery, and other models are limited to 36 hours maximum with Low Power Mode.
To get extended battery life, Apple Watch Ultra models need to have workout settings enabled for fewer heart rate and GPS readings.
- Launch the Settings app on your Apple Watch Ultra.
- Scroll to the bottom and tap Workout.
- Toggle on the switch next to Low Power Mode.
- Below "During Low Power Mode," toggle on the switch next to Fewer GPS and Heart Rate Readings.
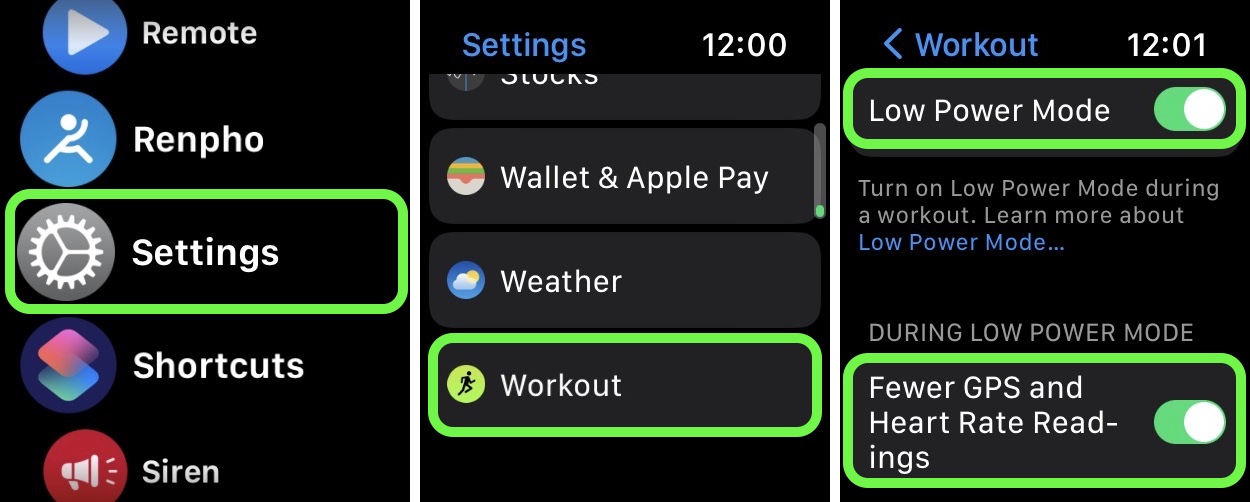
(Note that these settings are also available on Apple Watch Series 8 and second-generation Apple Watch SE, but Apple has not stated that they will extend battery life on these models beyond the 36 hours offered by the system-wide Low Power Mode.)
With Low Power Mode turned on and these Low Power Mode options for workouts enabled, the Apple Watch Ultra is able to preserve battery life for walking, running, and hiking workouts by cutting down on the frequency of heart rate and GPS readings and disabling alerts, splits, and segments.
12. Use Night Mode on Apple Watch Ultra
The Apple Watch Ultra comes with an exclusive Wayfinder watch face that has a built-in Night Mode. Night Mode turns the display red, making it easier to see when lighting is poor. Red light also preserves night vision, so you won't be temporarily blinded when out on a hike if you look at your watch in the dark.
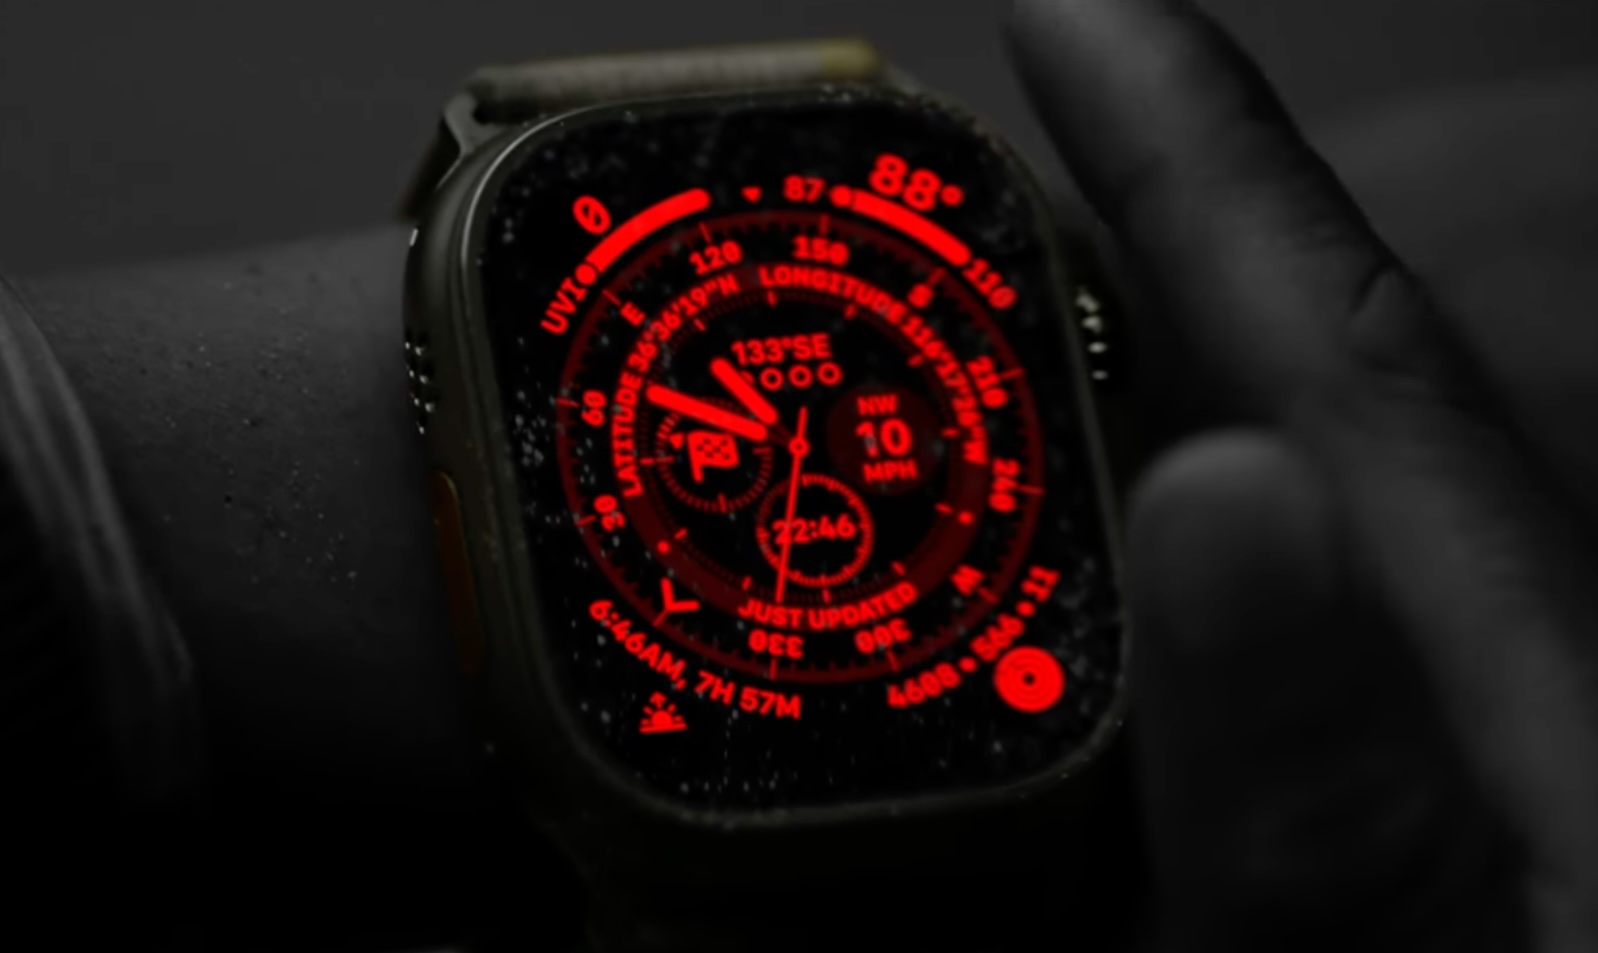
Here's how to turn on Night Mode:
- If it isn't already active, swipe to the new Wayfinder watch face, which is specially made for Apple Watch Ultra.
- Turn the Digital Crown to engage Night Mode.
- To turn it off, rotate the Digital Crown in the opposite direction.
Note that Night Mode only works when the Wayfinder watch face is being used - it's an exclusive feature to Wayfinder and cannot be enabled when any other watch face is displayed.
13. Customize the Action Button on Apple Watch Ultra
The Apple Watch Ultra is equipped with an Action button that is not available on any other Apple Watch model, and it can be set to do whatever you need. It can start a workout, launch the stopwatch, set a waypoint in the Compass app, activate the Compass app backtrack feature, start a dive, activate the Flashlight, or activate any Shortcut.
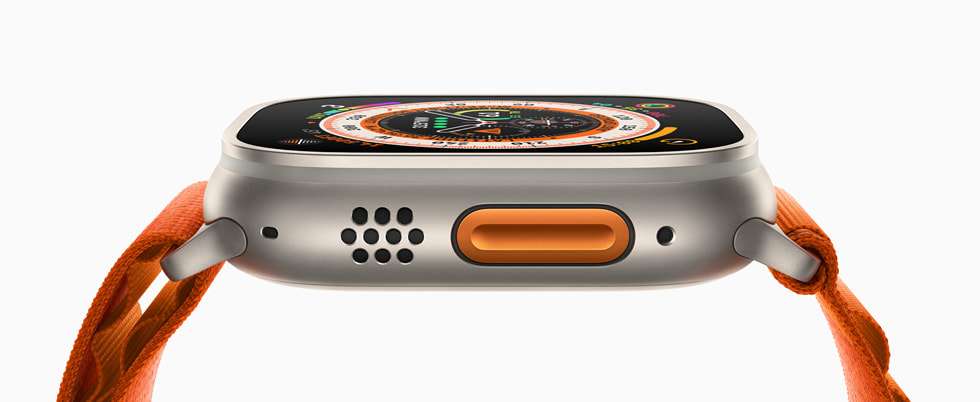
There are even deeper functions available depending on what's assigned. If you have the Action Button set to start a Workout, for example, you can choose a specific workout. And in the middle of a compatible workout, it can perform a secondary function such as marking segments or laps in a track workout.
If you want to change the function of your Action Button after setup, here's how:
- On Apple Watch Ultra, launch the Settings app.
- Scroll down and tap Action Button.
- Tap the menu under "Action" and select one of the following options: Workout, Stopwatch, Waypoint, Backtrack, Dive, Flashlight, and Shortcut.
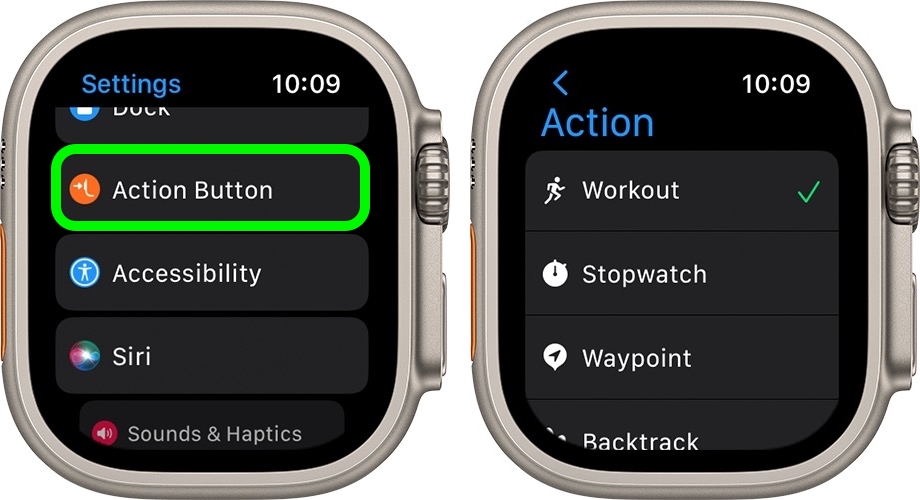
- Tap the arrow in the left-hand corner to go back to Action Button settings.
- Tap the menu under "App" if it appears, then select an app to perform the action. Some actions, such as Flashlight, don't show the App option.
- Tap the arrow to go back.
- Tap the menu under "First Press" if it appears, then select an action. Some features allow different actions to happen on the first and second press of the button.
Tips appear on the screen under "Gestures" explaining how the Action button works with the settings that you've assigned to it.
You're also able to configure your Action Button on the Apple Watch app on iPhone.
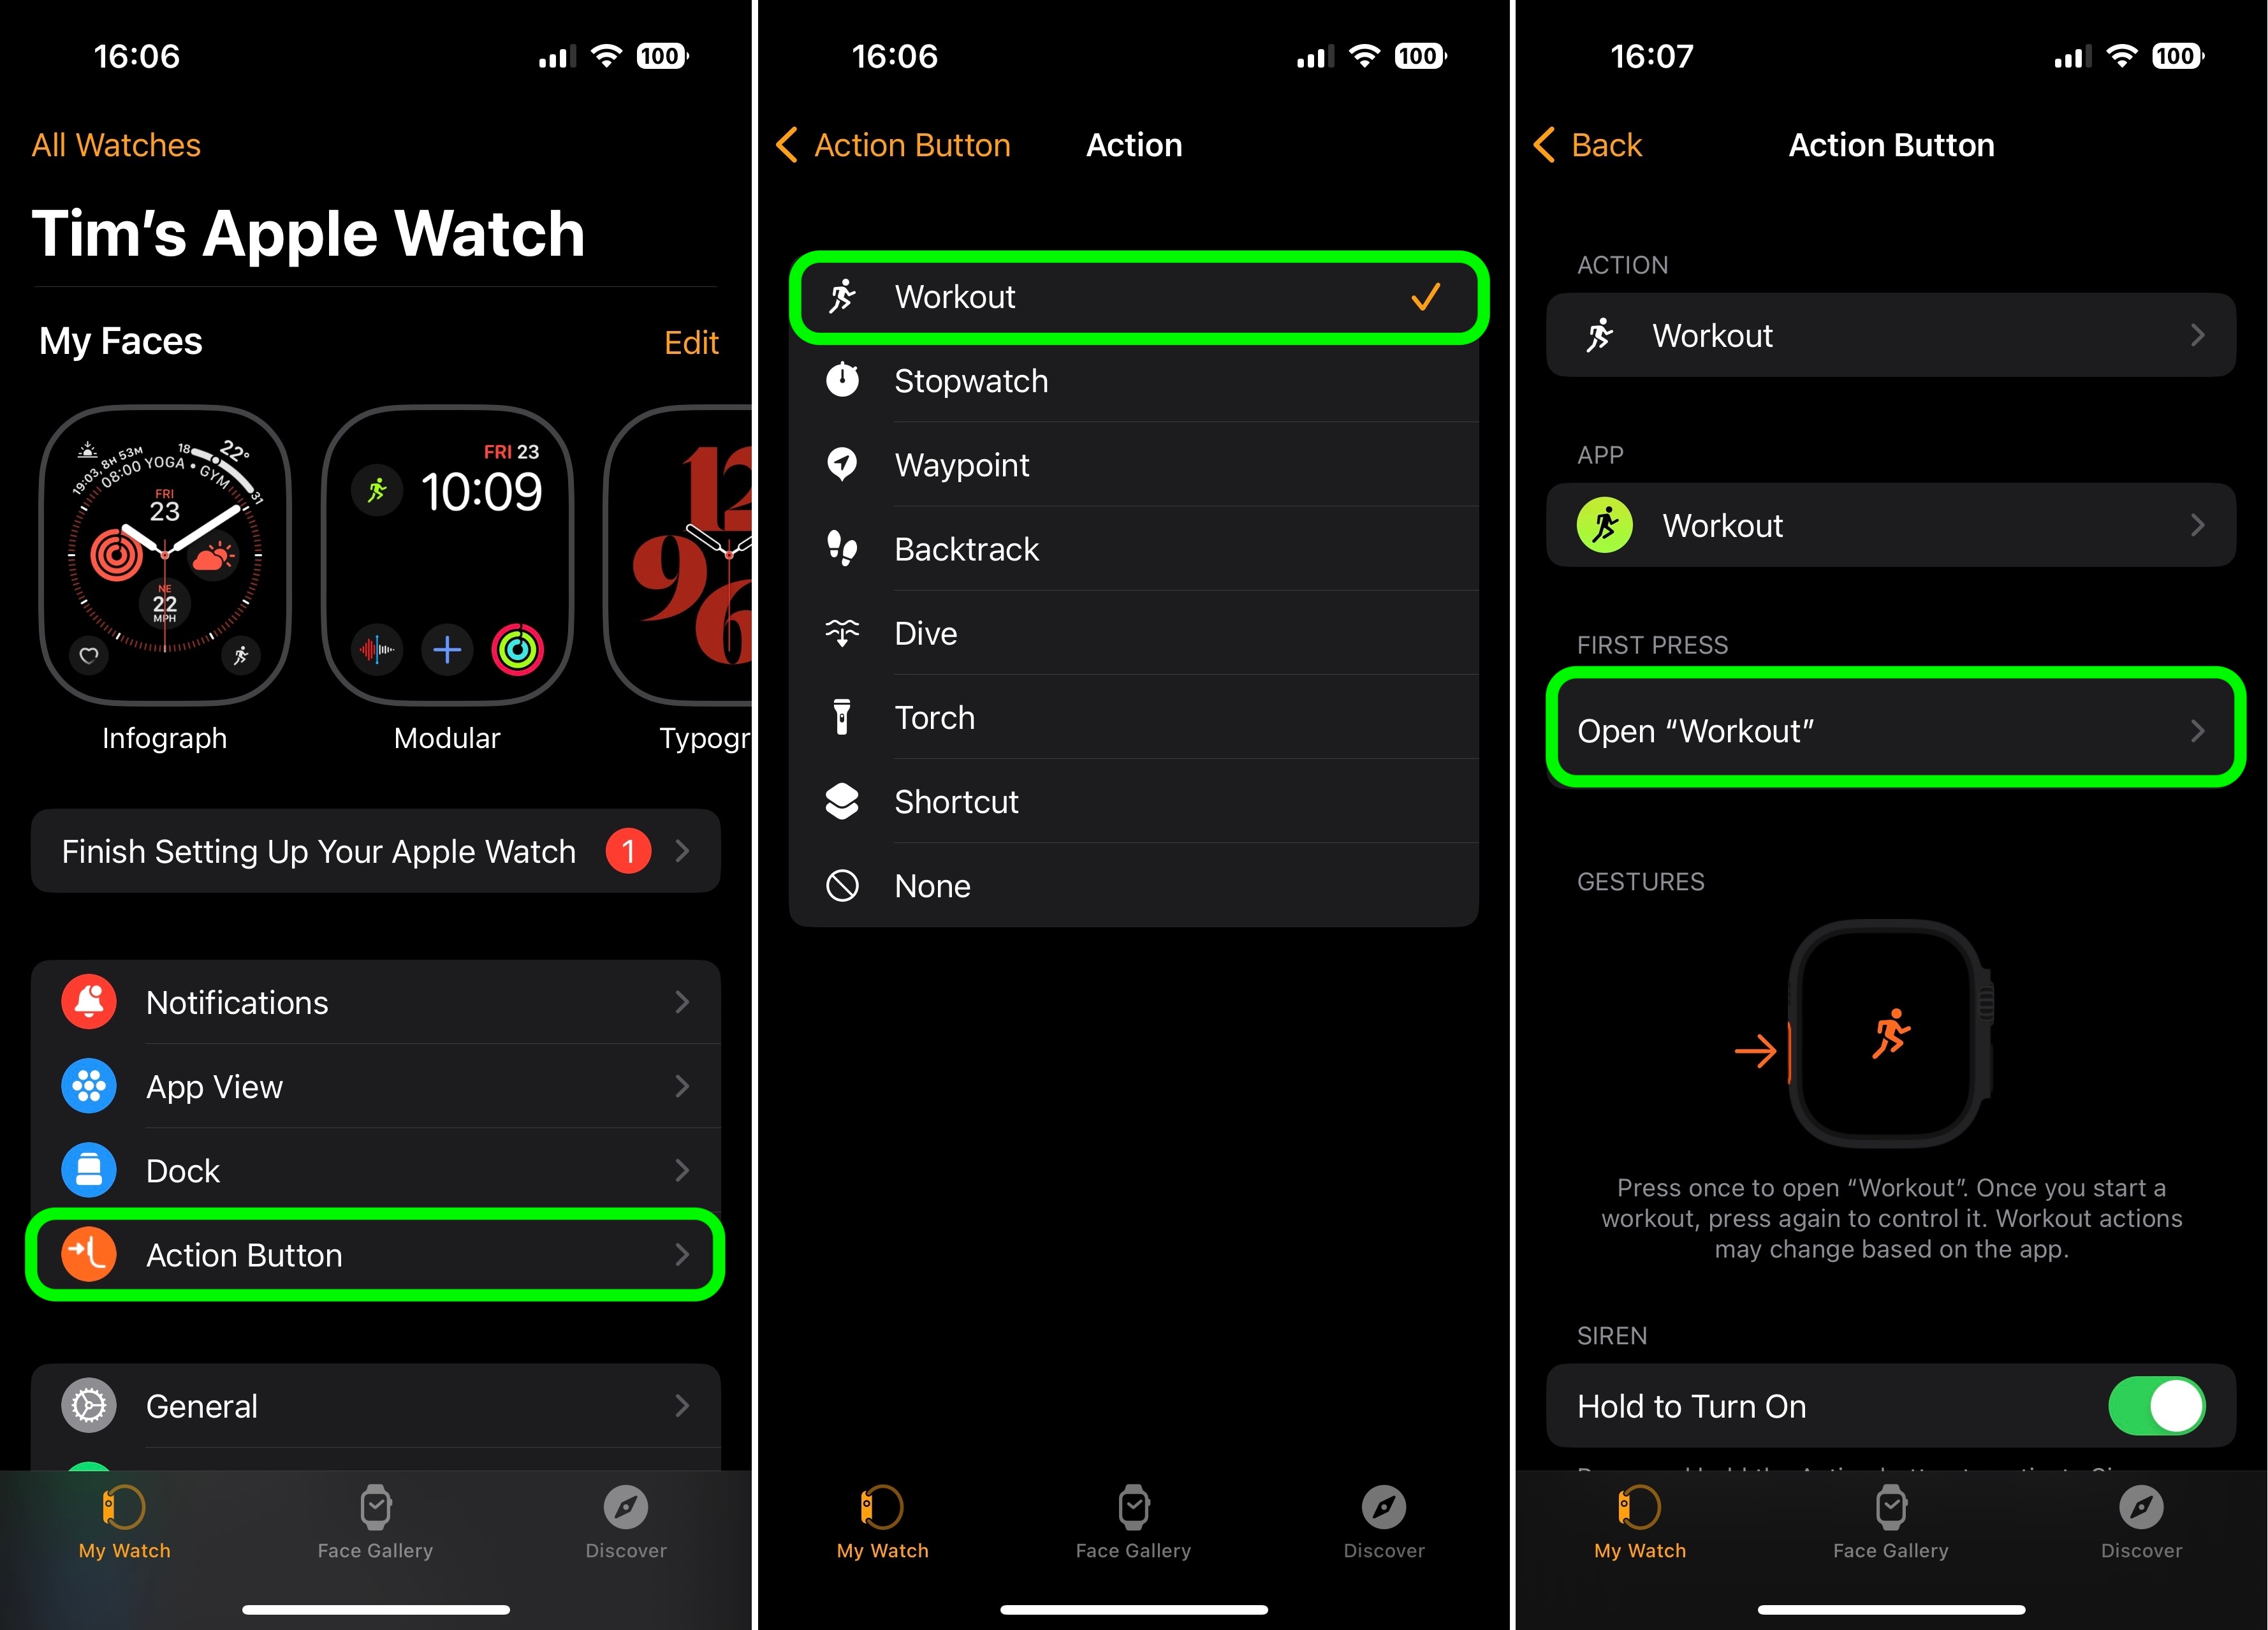
- Launch the Watch app on your iPhone.
- Tap the My Watch tab if it's not already selected.
- Tap Action Button.
- Under "Action," tap the currently selected action to change it.
- Select from one of the following options: Workout, Stopwatch, Waypoint, Backtrack, Dive, Flashlight, and Shortcut.
- Tap Action Button to go back to the previous menu.
- Tap the menu under "App" if it appears, then select an app to perform the action. Some actions, such as Flashlight, don't show the App option.
- Tap the arrow to go back.
- Tap the menu under "First Press" if it appears, then select an action. Some features allow different actions to happen on the first and second press of the button.
Learn More About Your Watch
We have dedicated roundups for the Apple Watch Series 8, the Apple Watch Ultra, and the Apple Watch SE, both of which provide a complete overview of the different features available with each model. Our watchOS 9 roundup also offers a good look at the newest features introduced to the Apple Watch through software.
Related Forum: Apple Watch
This article, "Tips for Getting the Most Out of Your New Apple Watch" first appeared on MacRumors.com
Discuss this article in our forums
source https://www.macrumors.com/guide/apple-watch-tips-and-tricks/


0 Comments